Migration
Specific migration tasks
3.9.x to 3.10.x
- The attachments (saved in the folder configured with the property ‘attachmentdir’ until 3.9.x) are now managed by the new ResourceManager and will be saved in the resource directory (configured with the property ‘resources.dir’).
- Remote-Client API: The class step.client.ControllerClient of the remote API has been renamed step.client.StepClient. This should be changed accordingly in the code using this API. If you don’t use the Remote-Client API, you’re not concerned by this change.
3.8.x to 3.9.x
The configuration file ScreenTemplates.js as been removed and migrated to the DB. It can now to be configured in the GUI, via REST or (not recommended) directly in the DB. When using the GUI, the entries of the old configuration file ScreenTemplate.js have to be entered under “Admin > Settings > Screens”.
The Keyword API slightly changed : the KeywordRunner run() method of the now returns an instance of step.functions.io.Output instead of step.grid.io.OutputMessage and throws exceptions. See this link for an example.
General migration process
Stop running instance
- If you installed step component as service, just stop the services.
- If not, make sure to kill the associated Java processes (1 for the controller, 1 per agent).
Database
Backup
Before any migration task, make sure to backup your database following this instructions.
Instance
Case 1 : new instance running instead of the old one
If your new step instance will replace the existing one, you have nothing to do regarding the database instance.
Case 2 : new instance running alongside the old one
If you new step instance will run alongside the existing one, you will have to start a new instance of MongoDB on a different port that the one used by the previous instance.
Follow below instruction in order to achieve this :
In …\step-controller-X.Y.Z\bin\, edit the file startMongo.bat
Replace the line
%MONGO_PATH%mongod.exe -dbpath ..\data\mongodb > mongod_%mydate%.log 2>&1With
%MONGO_PATH%mongod.exe --port PORT_NUMBER -dbpath ..\data\mongodb > mongod_%mydate%.log 2>&1
Then use this modified script to start your new MongoDB instance
Restore the data
Now that your new instance is running, you can restore your data into it by following this instructions.
Controller
Installation
Refer to the following page to install the step Controller.
Configuration review
You will have to migrate the configurations entries from the old configurations files to the new ones (refer to the following page) for more details about the step Controller configuration).
step.properties
Default path is : …\step-controller-X.Y.Z\conf\step.properties.
Rather than copying the old step.properties file to your new step installation, you should keep the new version of the file and adjust its settings according to your new setup.
Refer to the step properties section of the installation manual for more details.
Agents
Installation
Refer to the following page to install a step Agent.
Configuration review
You will have to migrate the configurations entries from the old configurations files to the new ones (refer to the following page for more details about the step Agents configuration).
AgentConf.json
Default path : …\step-agent-X.Y.Z\conf\AgentConf.json
- Compare the content of the old configuration file with the new one and adjust the necessary settings : (do not simply erase the new configuration file with the old one, you may loose any new settings introduced by the release)
If you new instance is running alongside the existing one, make sure to update the agents port used to connect to the controller Grid !!!
{
"gridHost":"http://localhost:CONTROLLER_GRID_PORT",
....
}
Refer to the AgentConf.json section of the installation manual for more details.
Binaries migrations
If you have installed any custom binaries in the Agent bin folder, make sure copy them to the new agents bin folder at …\step-agent-X.Y.Z\bin
Keywords
Re-compilation
In order for your keyword to work in a newest version of step, you will have then to recompile them with the new version of the step Api.
- For Java, you can change the version of step specified in your pom.xml
For .NET, follow below steps :
Remove the dependencies of Newtonsoft.Json, ScriptDev and ScriptApi from your Visual Studio project
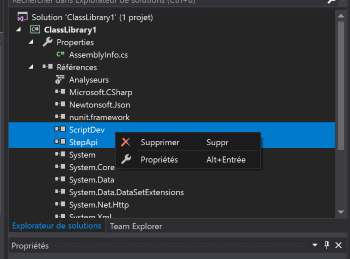
You will find the new version of these 3 DLLs in the bin folder of the new agent. You need to add them back to your Visual Studio project.
Rebuild your project and make sure the Keyword DLL is generated properly.
Go to next section “Re-deployment”
Re-deployment
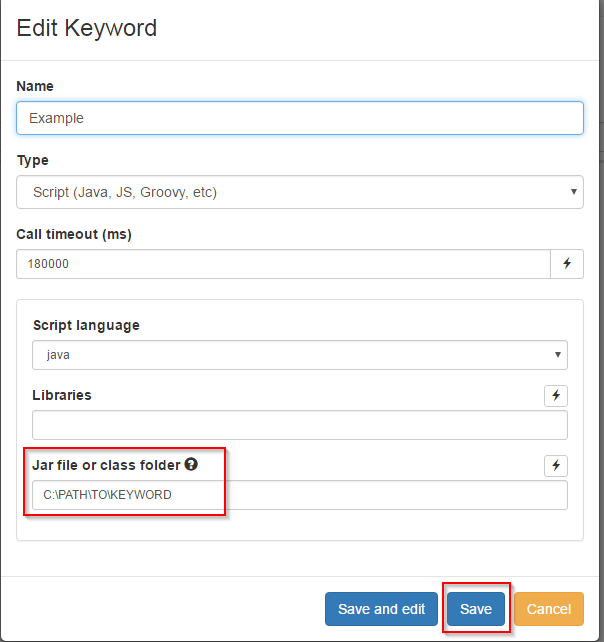
Once your keyword have been recompiled, if the keyword location has changed you will have to update it using step GUI :
- Click on the Keywords tab, search your keyword and click on the Configure button :

- Update the keyword path and press the Save button
Validation
Once you recompiled and redeployed your Keywords, we highly advise you to run a Smoke Test in order to make sure the migration completed successfully.