Continuous load testing with K6
Quickly integrate K6 based load-tests in your DevOps workflow
In this tutorial you’ll learn how to quickly set up a protocol based load test with K6 and integrate it into your CI/CD pipeline for continuous load testing.
The example simulates online shoppers using our demo online shop based on OpenCart.
Prerequisites
- Step: for this tutorial you’ll need access to a Step cluster. You can follow the quick setup guide to set up a SaaS cluster for free or set up your own on-premise cluster.
- GitLab or any other DevOps platform
- Maven (optional): to optionally build and execute the load test locally
Set up the project
Checkout
While you could set up your project from scratch, we recommend getting started with one of the samples available in our step-samples git repository. In this tutorial we’ll start with the project load-testing-k6
git clone https://github.com/exense/step-samples.git
cd step-samples/automation-packages/load-testing-k6
Project structure
The project “load-testing-k6” is a standard maven project ready to build. It contains the following files:
K6 Script
The K6 script used in the load test is contained in the file opencart-test.js. It navigates to the shop package, adds an item to the shopping cart, and performs the checkout procedure.
Automation package with load test plan
The plan configuring the load test is defined in the descriptor of the automation package: src/main/resources/automation-package.yaml.
That file defines a Step Keyword which calls the aforementioned K6 script, as well as the actual load test Plan calling that keyword multiple times.
The example simulates a number of parallel users, each placing multiple orders in sequence. As you can see, the specification is straightforward – the complete definition is shown below.
---
schemaVersion: 1.0.0
name: "load-testing-k6-automation-package"
keywords:
- K6:
name: 'OpenCart home'
vus: 1
iterations: 1
scriptFile: "opencart-test.js"
plans:
- name: "Opencart load test plan"
root:
testScenario:
children:
- threadGroup:
users: 5
iterations: 10
children:
- callKeyword:
keyword: "OpenCart home"
Maven Project
The file pom.xml defines how the maven project, and thus the automation package, is built and how it is executed in Step.
The section relevant to the execution of the load test is shown here:
<build><plugins><plugin>
<groupId>ch.exense.step</groupId>
<artifactId>step-maven-plugin</artifactId>
<executions>
<execution>
<id>execute-automation-package</id>
<phase>integration-test</phase>
<configuration>
<url>${step.url}</url>
<authToken>${step.auth-token}</authToken>
<stepProjectName>${step.step-project-name}</stepProjectName>
<executionParameters>
<env>TEST</env>
</executionParameters>
<waitForExecution>true</waitForExecution>
<executionResultTimeoutS>600</executionResultTimeoutS>
<ensureExecutionSuccess>true</ensureExecutionSuccess>
</configuration>
<goals>
<goal>execute-automation-package</goal>
</goals>
</execution>
</executions>
</plugin></plugins></build>
These definitions ensure that during the integration-test phase of maven (which is performed as part of the mvn verify command), the execute-automation-package goal provided by the Step maven plugin is run. For more information about the various maven phases, see this reference.
You will need to provide the URL to your Step cluster, as well as the project name and authorization token (Step EE only). In this example, the actual values are referencing variables which are conveniently defined at the beginning of the file. Make sure to adjust these values to your setup.
The other configuration parameters specify parameters to pass to Step for the actual execution (executionParameters), tell maven to wait for the execution result for a maximum of 10 minutes (waitForExecution and executionTimeoutS), and finally, to check that the execution in Step was indeed successful (ensureExecutionSuccess).
Execute locally
During development or for debugging purposes, you can execute the load test locally using the following command:
mvn test
Note that this will launch the full load test from the machine where the command is executed. You may want to change the AP definition to use a lower number of simulated users and/or iterations when launching the test this way.
Execute in Step
To trigger the execution in a Step cluster, run the following maven command:
mvn verify -DskipTests
The load test is executed in Step according to the plan specified in resources/automation-package.yaml. The maven project is configured to wait for the execution to complete.
Integrate into the CI/CD pipeline
As the project is a standard maven project, the integration into any CI/CD pipeline is straightforward.
In this tutorial we’ll show how to integrate it using GitLab. Doing the same with any other CI/CD pipeline supporting Maven is very similar.
Create a project in GitLab, clone it, then copy the contents of the sample maven project “load-testing-okhttp” directly into the git project directory.
The project already includes a suitable .gitlab-cy.yml:
image: maven:3-openjdk-11
variables:
STEP_URL: "https://your-step-instance.url/"
STEP_PROJECT: "Common"
STEP_TOKEN: "Your Step API token"
MVN_ARGS: >-
--settings gitlab-maven-settings.xml
-Dmaven.repo.local=.m2/repository
--batch-mode
--no-transfer-progress
cache:
paths:
- .m2/repository
stages:
- verify
maven-verify-job:
stage: verify
script:
- mvn ${MVN_ARGS} verify -DskipTests -Dstep.url=${STEP_URL} -Dstep.step-project-name=${STEP_PROJECT} -Dstep.auth-token=${STEP_TOKEN}
You only have to adjust the Step URL, project name, and token in this file. In addition, please
modify the gitlab-maven-settings.xml to include your credentials for accessing the Exense maven repository.
Pushing these changes to the remote repository will trigger the execution of the build pipeline in GitLab, which will run the mvn verify command. This command in turn will trigger the execution of the load test in your Step cluster.
Analyze the results
After execution of the pipeline in GitLab the job report should look similar to this:
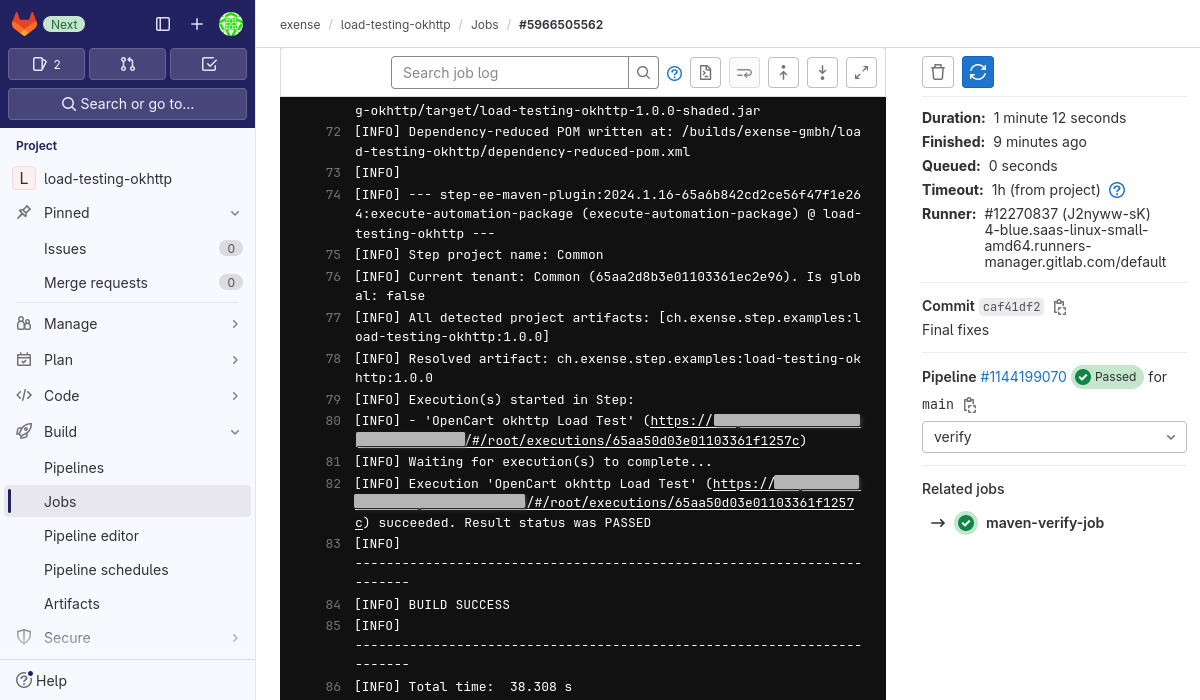
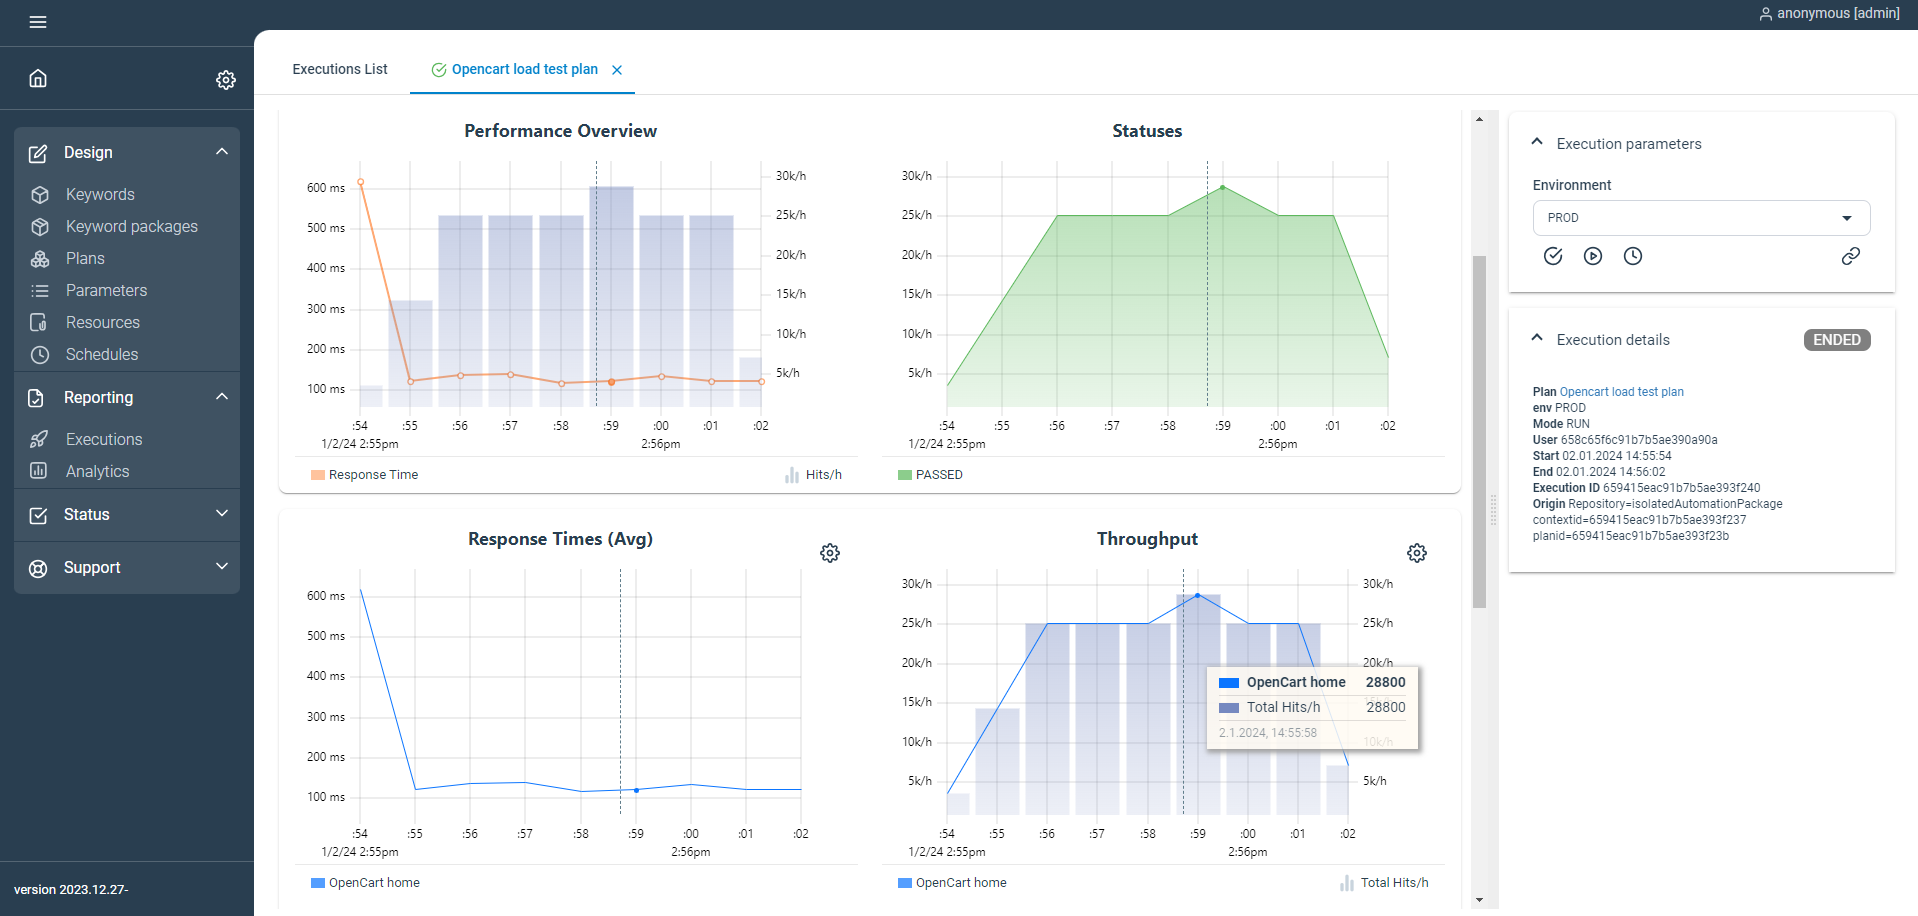
To analyze the results of the load test execution in Step, navigate to the execution link printed in the logs of the job:

This article demonstrates how to connect Grafana to data generated by Step.
This article demonstrates how to set up distributed system monitoring using Keyword executions, and analyze the results as measurements.
This tutorial demonstrates how to automate interaction with Microsoft Office applications using the Office Interop Assembly.

This article provides documentation for how to integrate JUnit tests into Step.
This tutorial demonstrates how Step can be used to monitor services, availability and performance metrics.
This tutorial demonstrates how to utilize the AutoIt C# binding to automate interactions with Windows applications.

This article demonstrates the automation of mobile applications on Android using the Appium framework.
This article defines three Keywords which will be used in browser-based automation scenarios, using Step and Selenium, as general drivers.

This tutorial shows you how to efficiently set up a browser-based load test using existing Cypress tests in the Step automation platform.
In this short tutorial, we show how to quickly implement a simple browser-based load test based on Cypress scripts in Step.

This tutorial shows you how to efficiently set up a browser-based load test using existing Playwright tests in the Step automation platform.

This article explains Keywords in Step and demonstrates how to create simple ones.

This tutorial demonstrates the design, execution, and analysis of functional tests using the web interface of Step.
This tutorial will demonstrate how to use Step and Selenium to automate various browser tasks.
This tutorial demonstrates how to use Step and Cypress to automate various browser tasks.

This tutorial demonstrates how Selenium automation tests can be turned into full synthetic monitoring using Step.
In this tutorial, we'll show you how to easily set up and run a browser-based load test with Step's wizard, using your existing Cypress tests, on the Step automation platform.

This tutorial shows you how to efficiently set up a browser-based load test using existing Selenium tests in the Step automation platform.

This tutorial demonstrates how Playwright automation tests can be turned into full synthetic monitoring using Step.
This tutorial demonstrates how Cypress automation tests can be turned into full synthetic monitoring using Step.

This tutorial will demonstrate how to use Step and Playwright to automate various browser tasks.
In this tutorial, we'll show you how to easily set up and run a browser-based load test with Step's wizard, using your existing Playwright tests, on the Step automation platform.
Learn how to quickly set up continuous browser-based load testing using Cypress tests in your DevOps pipeline
This tutorial demonstrates how Playwright tests can be reused for synthetic monitoring of a productive environment in a DevOps workflow
This tutorial demonstrates how Playwright tests can be reused for synthetic monitoring of a productive environment in a DevOps workflow
In this tutorial you'll learn how to quickly set up a protocol-based load test with okhttp

Learn how to set up continuous end-to-end testing across several applications based on Playwright tests in your DevOps pipeline using Step
Learn how to quickly set up continuous browser-based load testing using Playwright tests in your DevOps pipeline
Want to hear our latest updates about automation?
Don't miss out on our regular blog posts - Subscribe now!
