Robotic Process Automation (RPA) with Cypress
This tutorial demonstrates how to use Step and Cypress to automate various browser tasks.
Get Step SaaS for free to follow this tutorial
This tutorial will demonstrate how to use Step and Cypress to automate various browser tasks. In this example, we will be automating an update to the inventory of a Demo online shop running at https://opencart-prf.exense.ch/admin/ .
This is a technical tutorial intended for users who are already familiar with RPA and Cypress.
Prerequisites
- Step: You can either install Step Enterprise or OS following the quick setup guide or get a SaaS instance up and running in minutes. For most users the SaaS option is recommended, you can get it easily up and running on stepcloud.ch.
- git
- (optional) cypress 9: Use npm i cypress@9 or check this guide how to install Cypress on your local machine.
Preparing the sample project
We have prepared a sample project that will be used throughout this tutorial which uses Cypress to automate interactions with a test environment called OpenCart that is provided by us.
1. Get the code
The project is available on GitHub; to clone it using git, run:
git clone https://github.com/exense/step-samples.git
2. (optional): Run tests locally
To run it locally in headed mode using Cypress:
cd step-samples/keywords/cypress_RPA/opencart_RPA
cypress run --headed
This will open a browser window and run the test case, you can see the automated process setting the stock.
3. Check the source code
Take a moment to look at the sample project code – we tried to keep it as simple and straightforward as possible. You can find it in the sample project folder under: step-samples/keywords/cypress_RPA/opencart_RPA/cypress
In particular, take a look at the code defined in /support/commands.js
Note that there are several custom Cypress functions defined. The following two will be particularly relevant in the course of this tutorial:
Cypress.Commands.add('Opencart_Admin_Login', () => { ... })
Cypress.Commands.add('Opencart_Admin_Update_Product', (productName, quantity) => { ... })
- There is one command defined as “Opencart_Admin_Login”, which does not take any arguments, since username and password are already hardcoded for simplicity (username: “demo”, password: “demo”). It navigates to our OpenCart instance and logs in.
- The other command is called “Opencart_Admin_Update_Product” and takes two arguments, productName and quantity. It navigates to the product with the given name and updates its quantity.
4. Package the keywords as a zip-file
In order to import Cypress functionality into STEP, we need to create a single zip file of the opencart folder.
cd step-samples/keywords/cypress_RPA
zip -r opencart_RPA.zip opencart_RPA
This creates a file, named “opencart_RPA.zip”. It is the file that we will import into Step.
5. Switch to your Step instance
If you have access to an existing Step instance (on-premise or cloud), access it and log in, see prerequisites if not.
6. Create the Login Keyword
In order to use (and reuse) the functionality defined in commands.js we need to wrap the individual functions into keywords.
Step has a special view for managing Keywords. This screenshot shows the Keywords view with the New Keyword dialog open as a reference for the next steps.
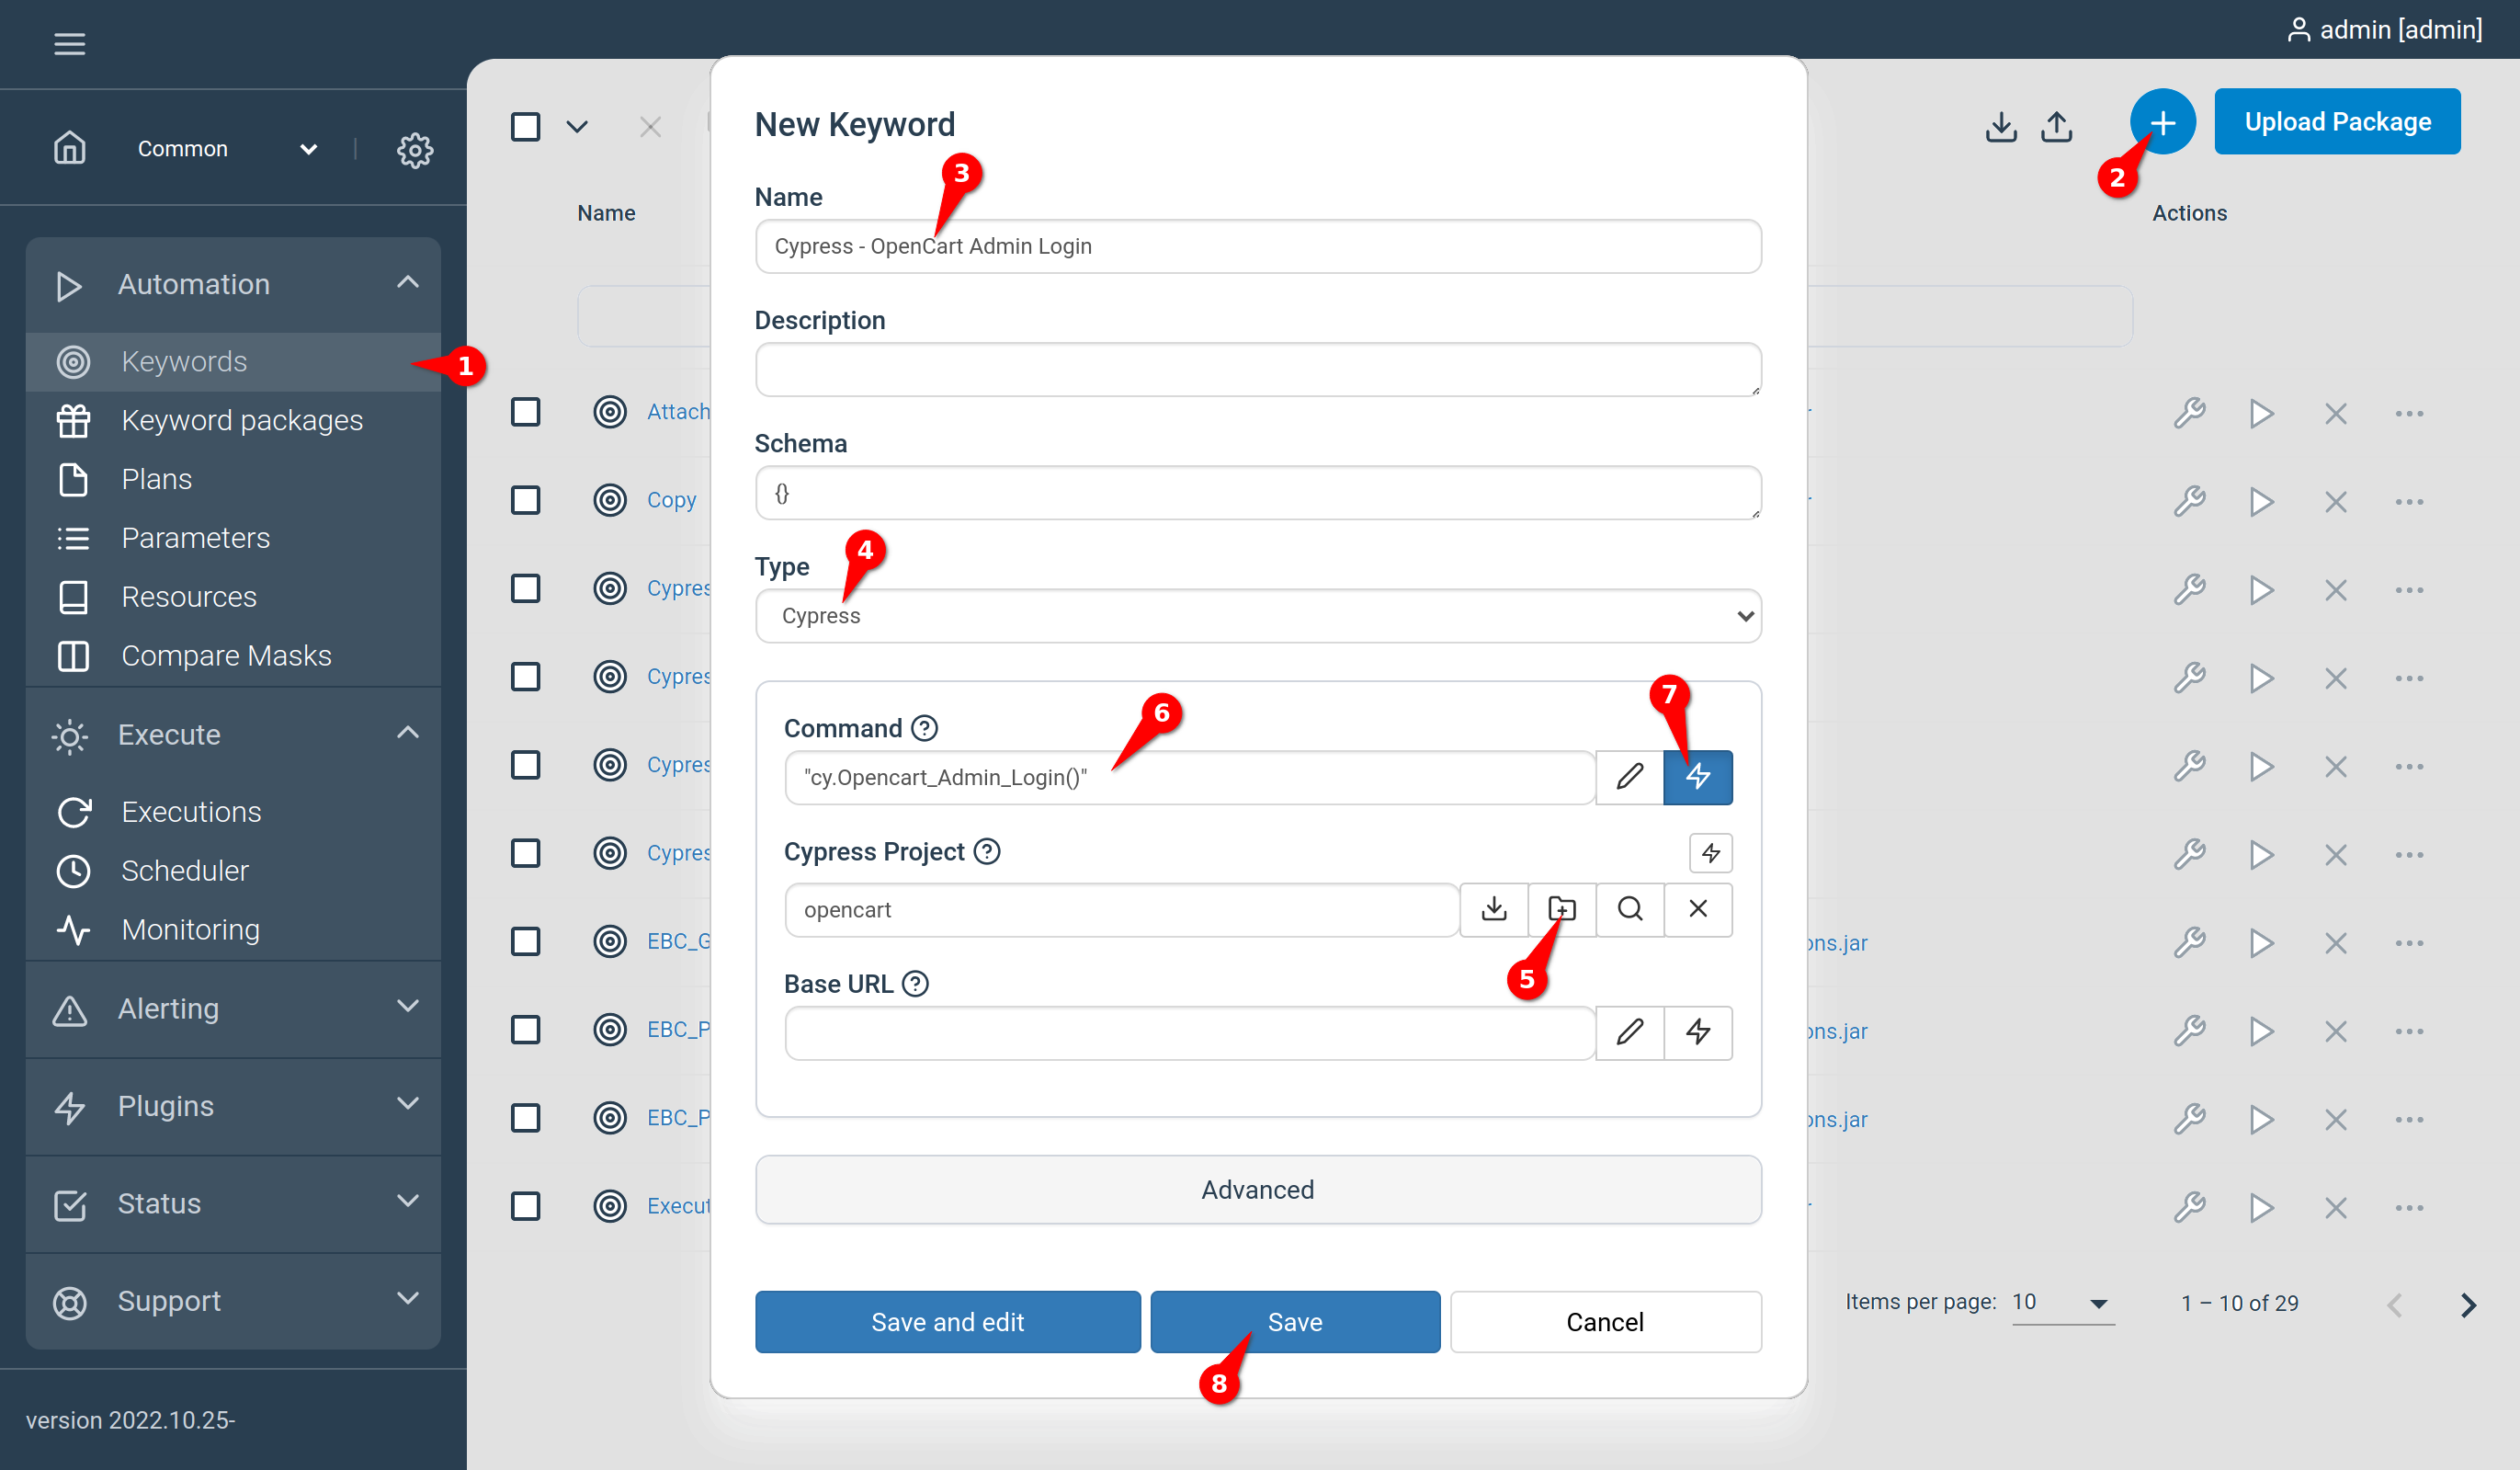
- Navigate to Keywords
- Click the + button
- In the dialog, enter a meaningful name for the new keyword
- Choose Cypress from the Type-dropdown
- As Cypress Project, upload the zip file we created previously
- Now we want to specify the command we want to call:
"cy.Opencart_Admin_Login()"
- Click the lightning icon to mark the expression as “dynamic”
- Hit the SaveButton
7. Create the Inventory-Update Keyword
We create another keyword just like in the previous step but as Command we enter:
"cy.Opencart_Admin_Update_Product('${product}', '${quantity}')"
Don’t forget to mark the command as dynamic by activating the lightning icon.
Define the Robotic Process Automation (RPA)
For the purposes of this tutorial, we will use Step to automate the process of updating the inventory of an online shop. Therefore we need to set up a “Plan”, in which we define which steps should be executed to perform the inventory update. Simply put, we want to automate a browser to log in to the OpenCart web shop and update the quantities of some of the products we have specified in a CSV file.
1. Create a new Plan
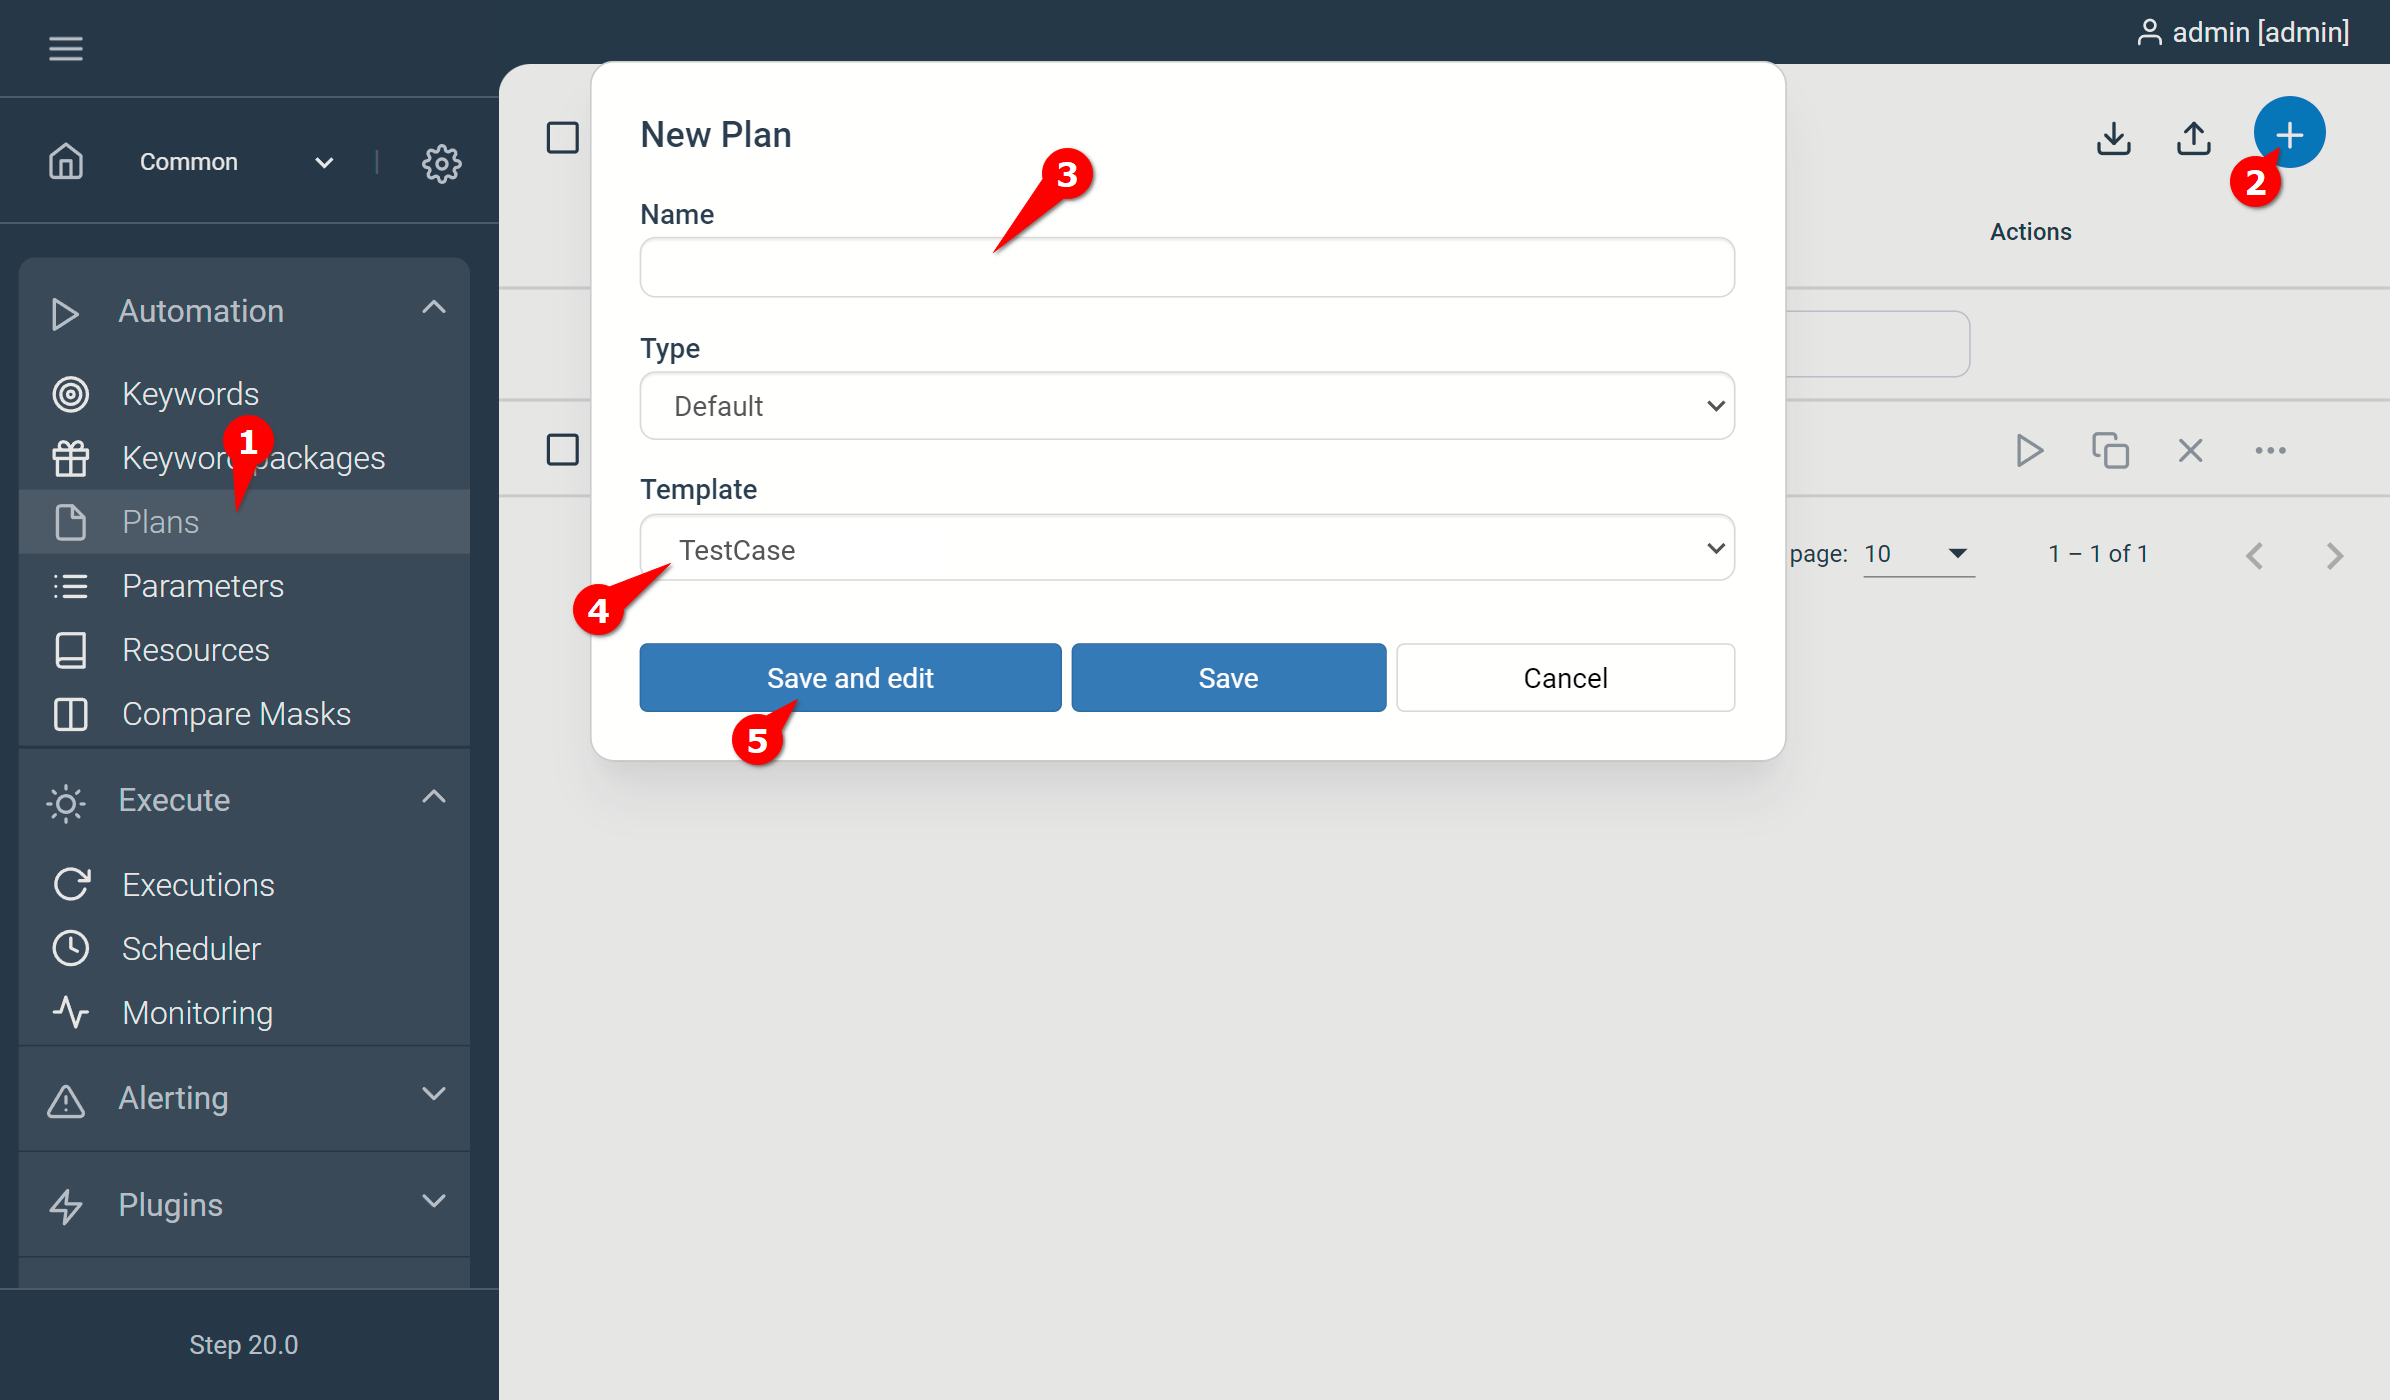
- Navigate to Plans
- Click + to create a new plan
- Enter a name
- Select “TestCase” as a Template
- Click Save and edit
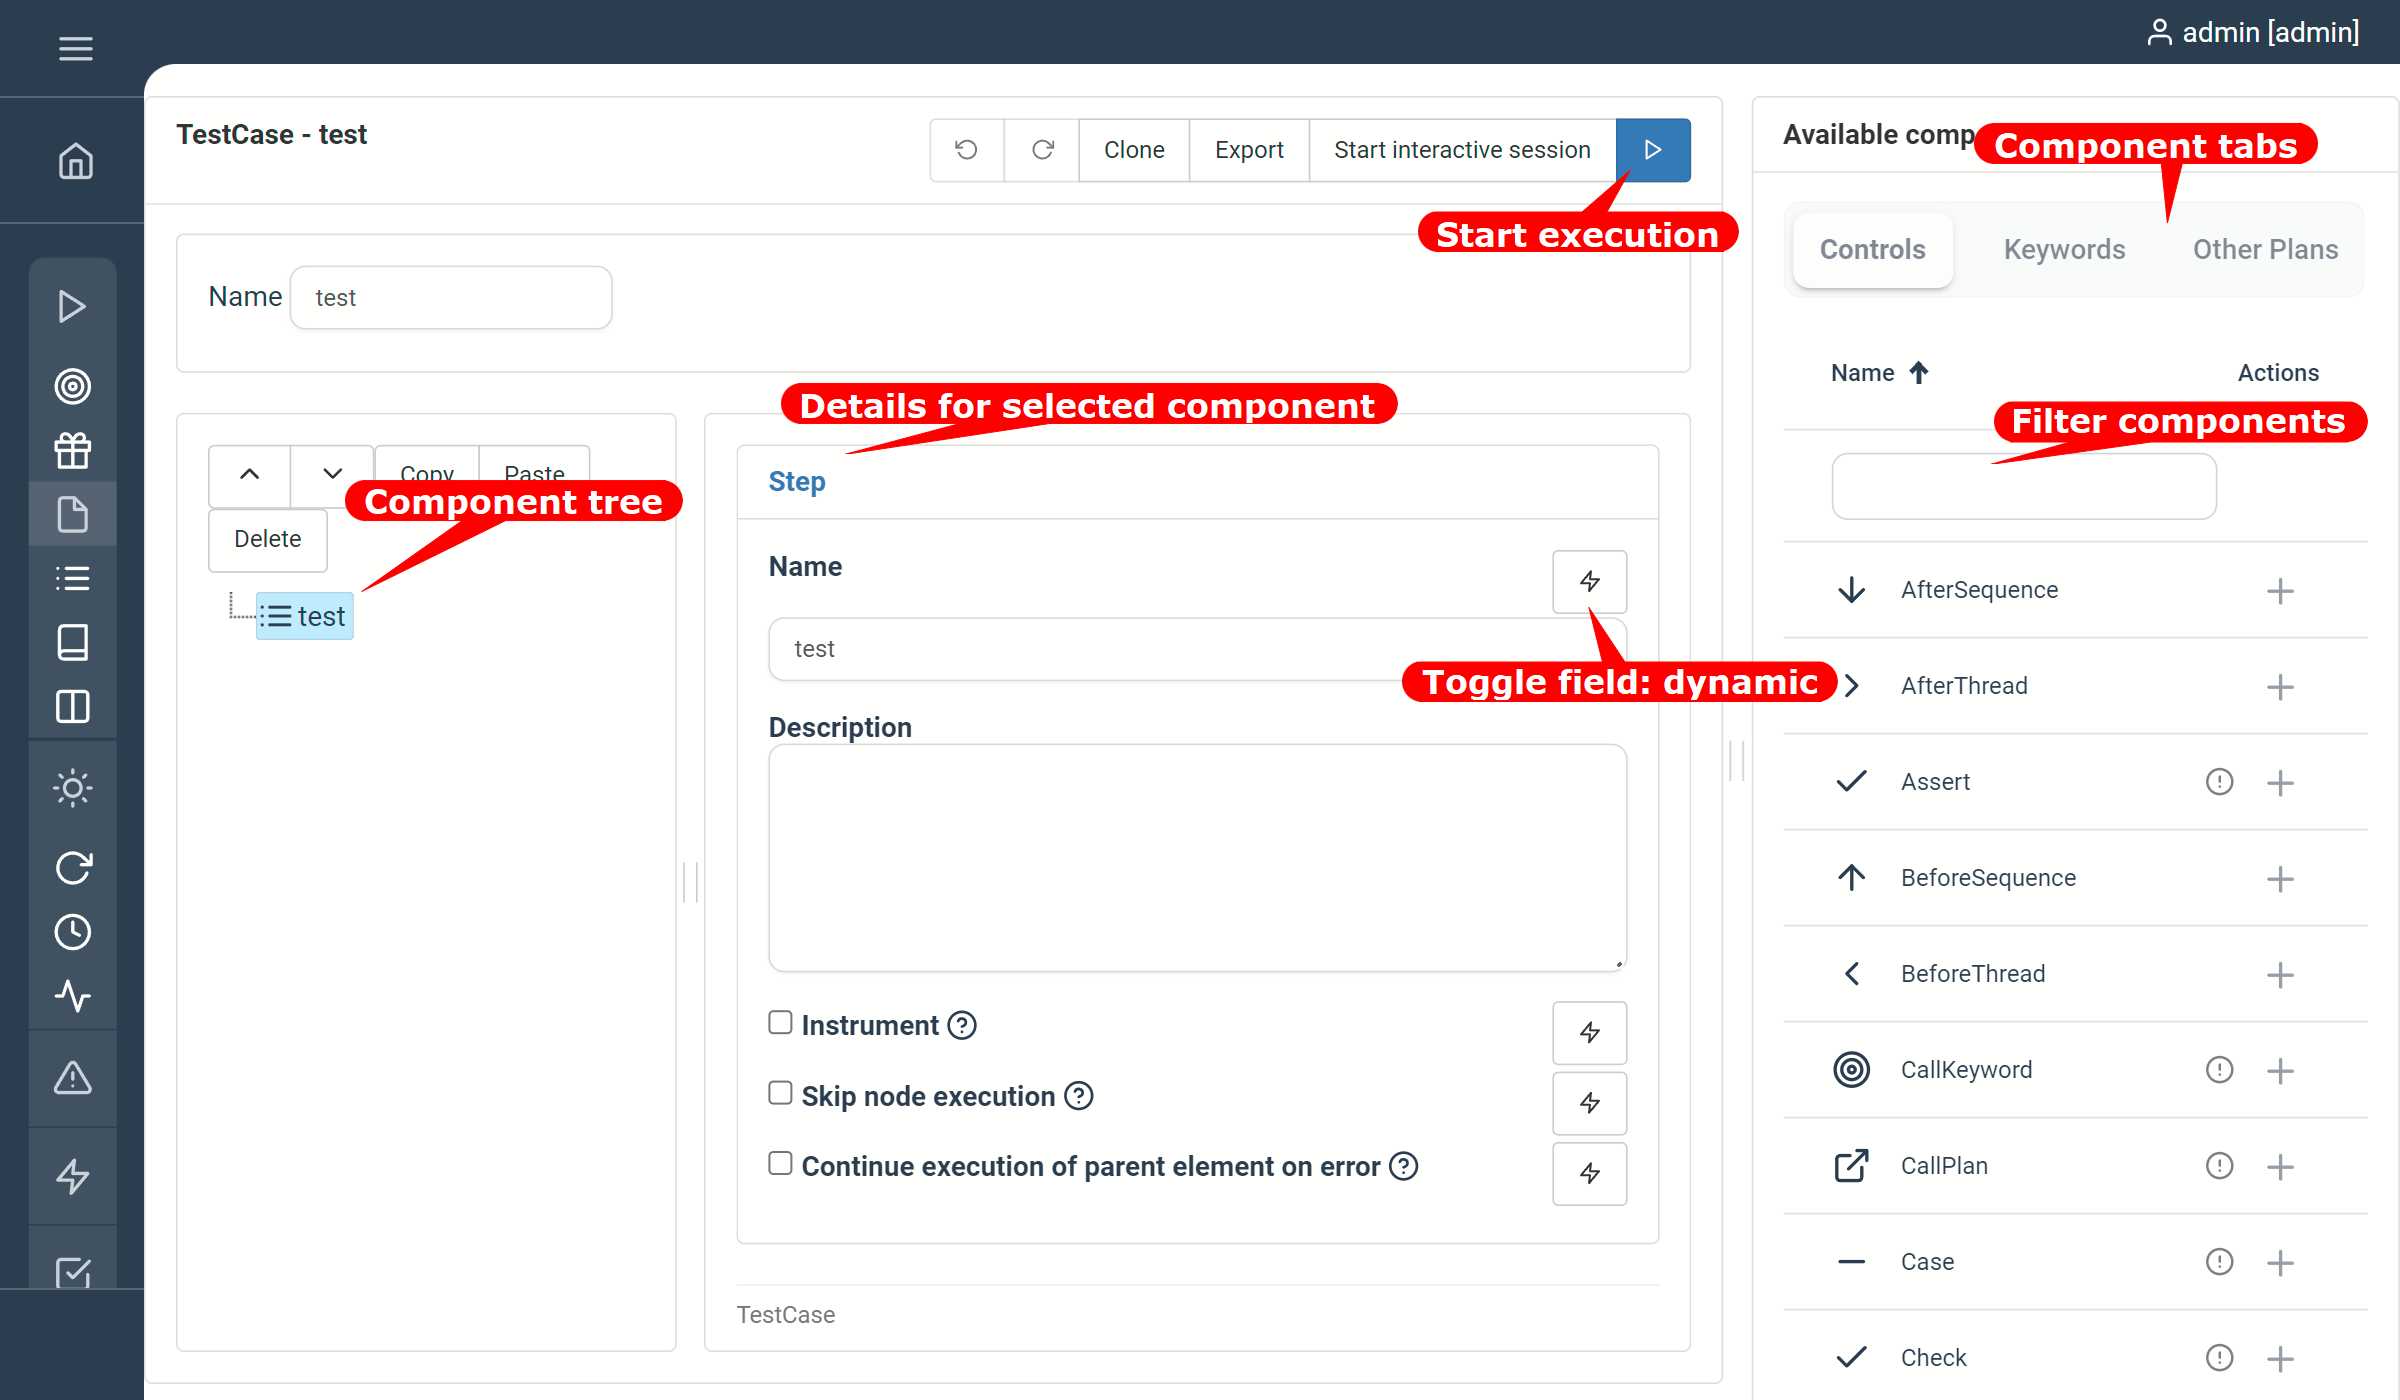
2. How to configure the Plan
The visual editor is the main tool to create and edit plans in Step. We will use this to create the RPA, so get familiar with the UI explained in this screenshot:
3. Add the Login-Keyword to the new Plan
In order to define what our plan is going to do, we have to add our already created keywords to it and configure them. First of all we want to tell STEP to log in to OpenCart. Therefore we add the Admin-Login keyword:
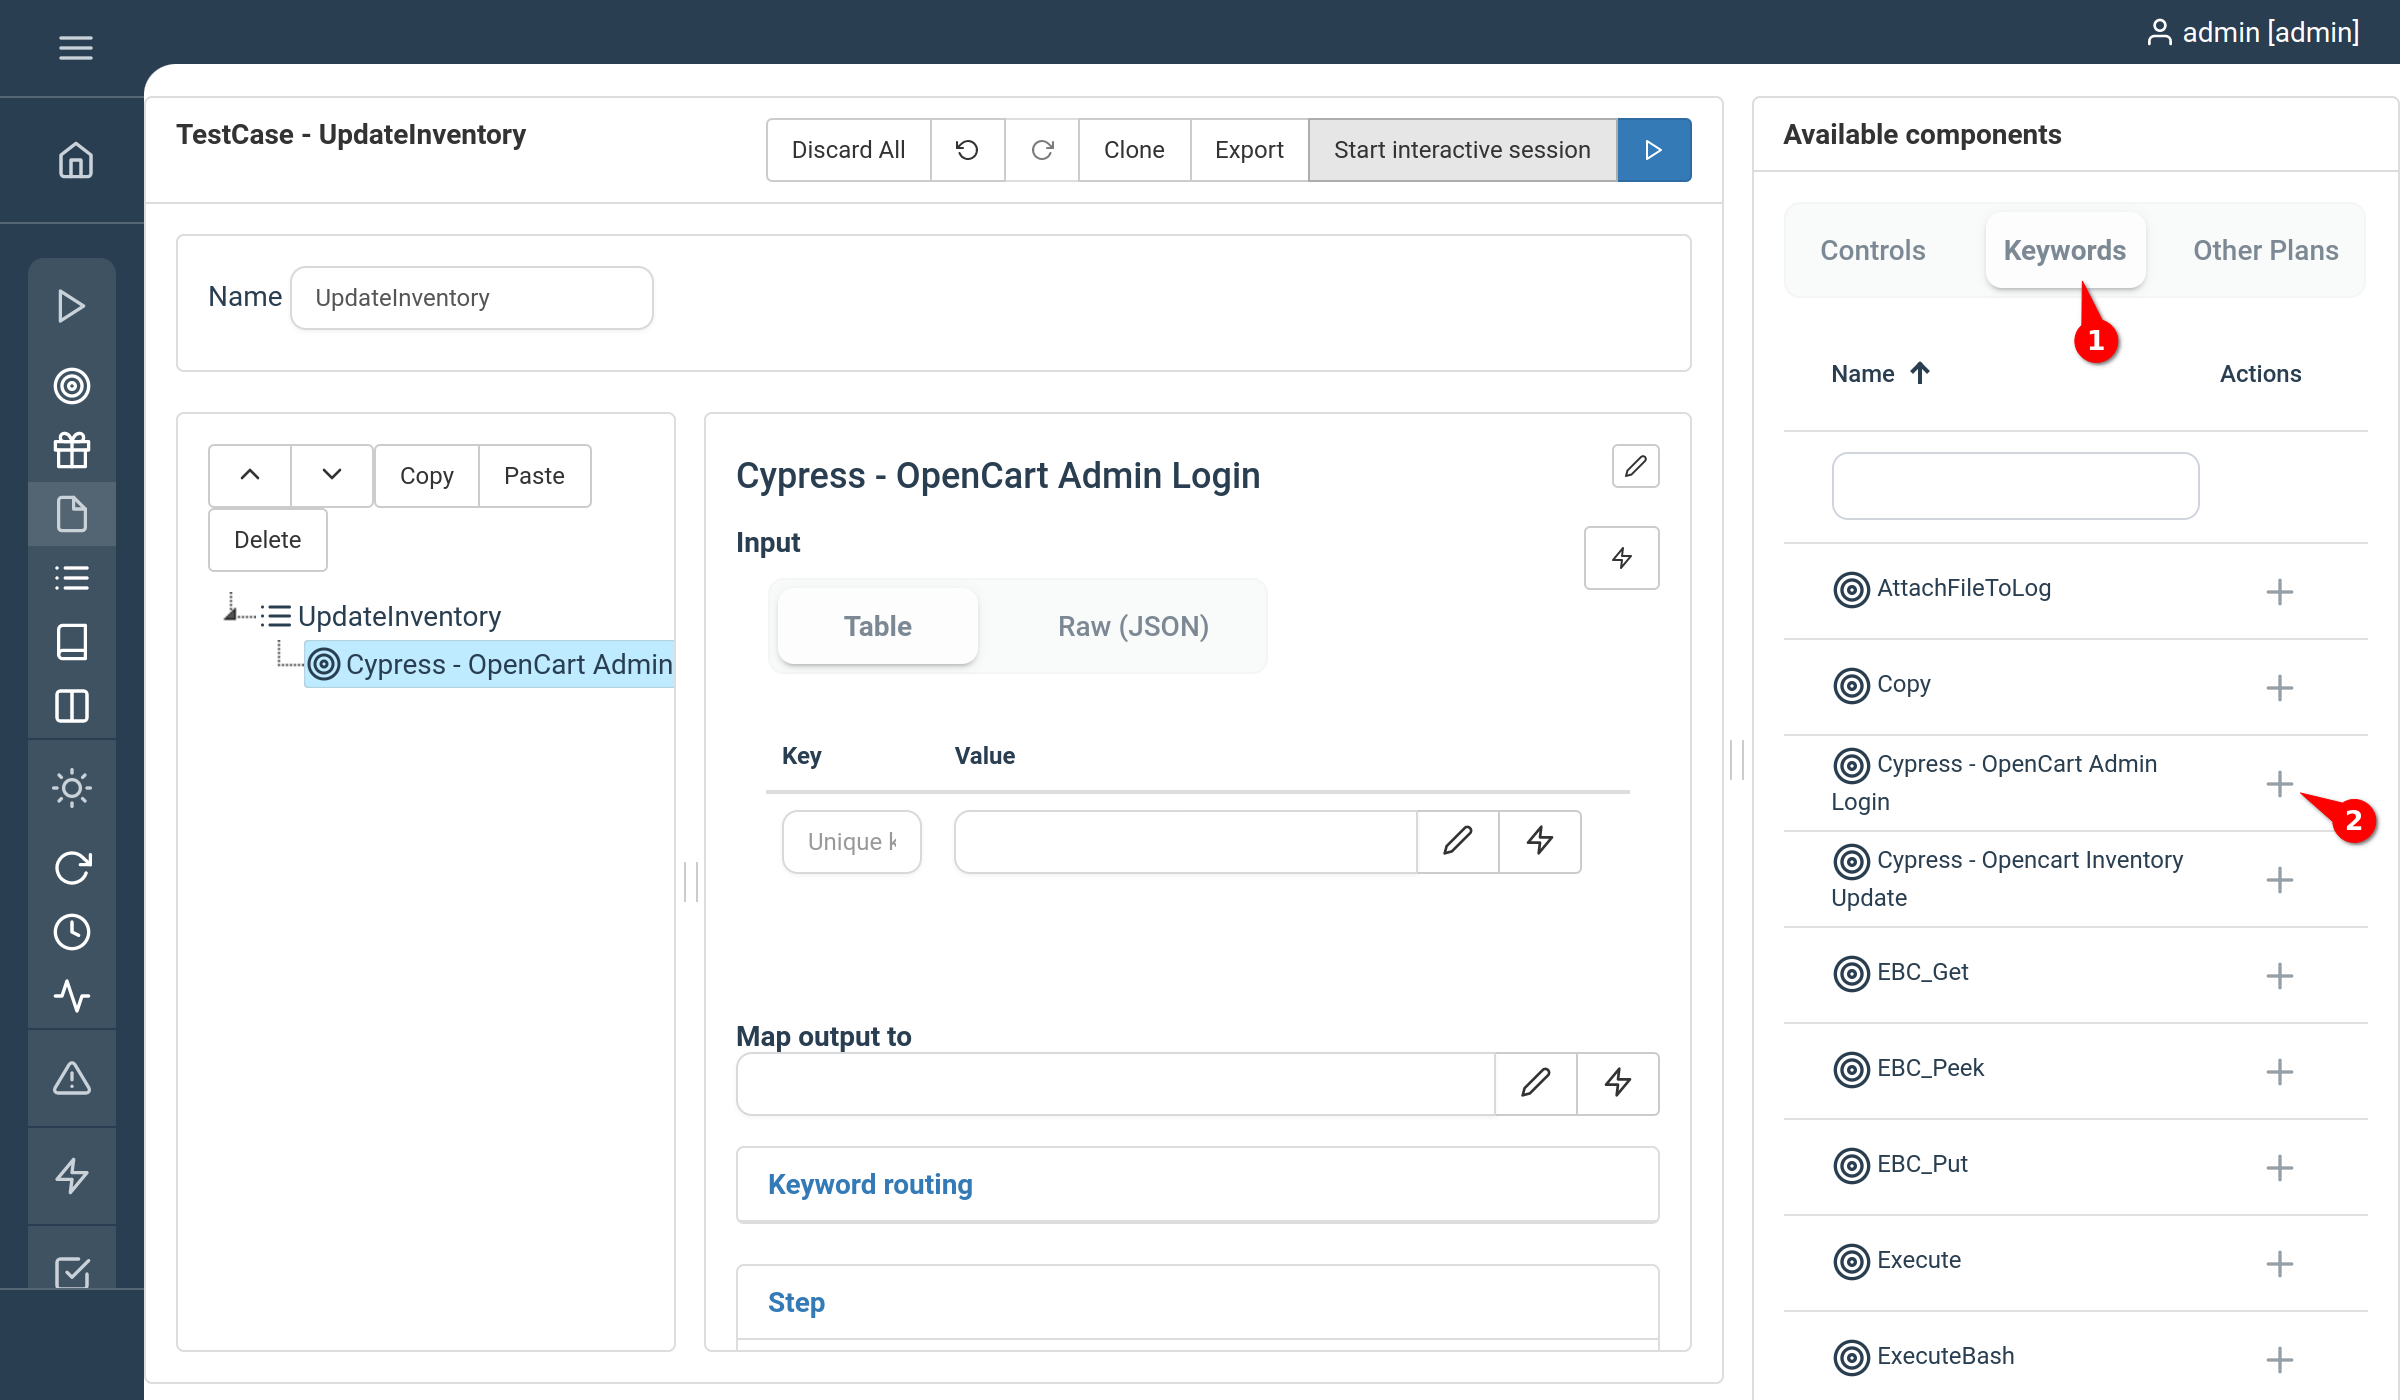
- Click on “Keywords” to open a list of available keywords
- Find the Keyword with name you defined for the Admin Login keyword and click its + button to add it to the plan
4. Add and configure the ForEach-Control
As we want to modify a bunch of products on the basis of a CSV file, we need to define a loop and iterate over the CSV data.
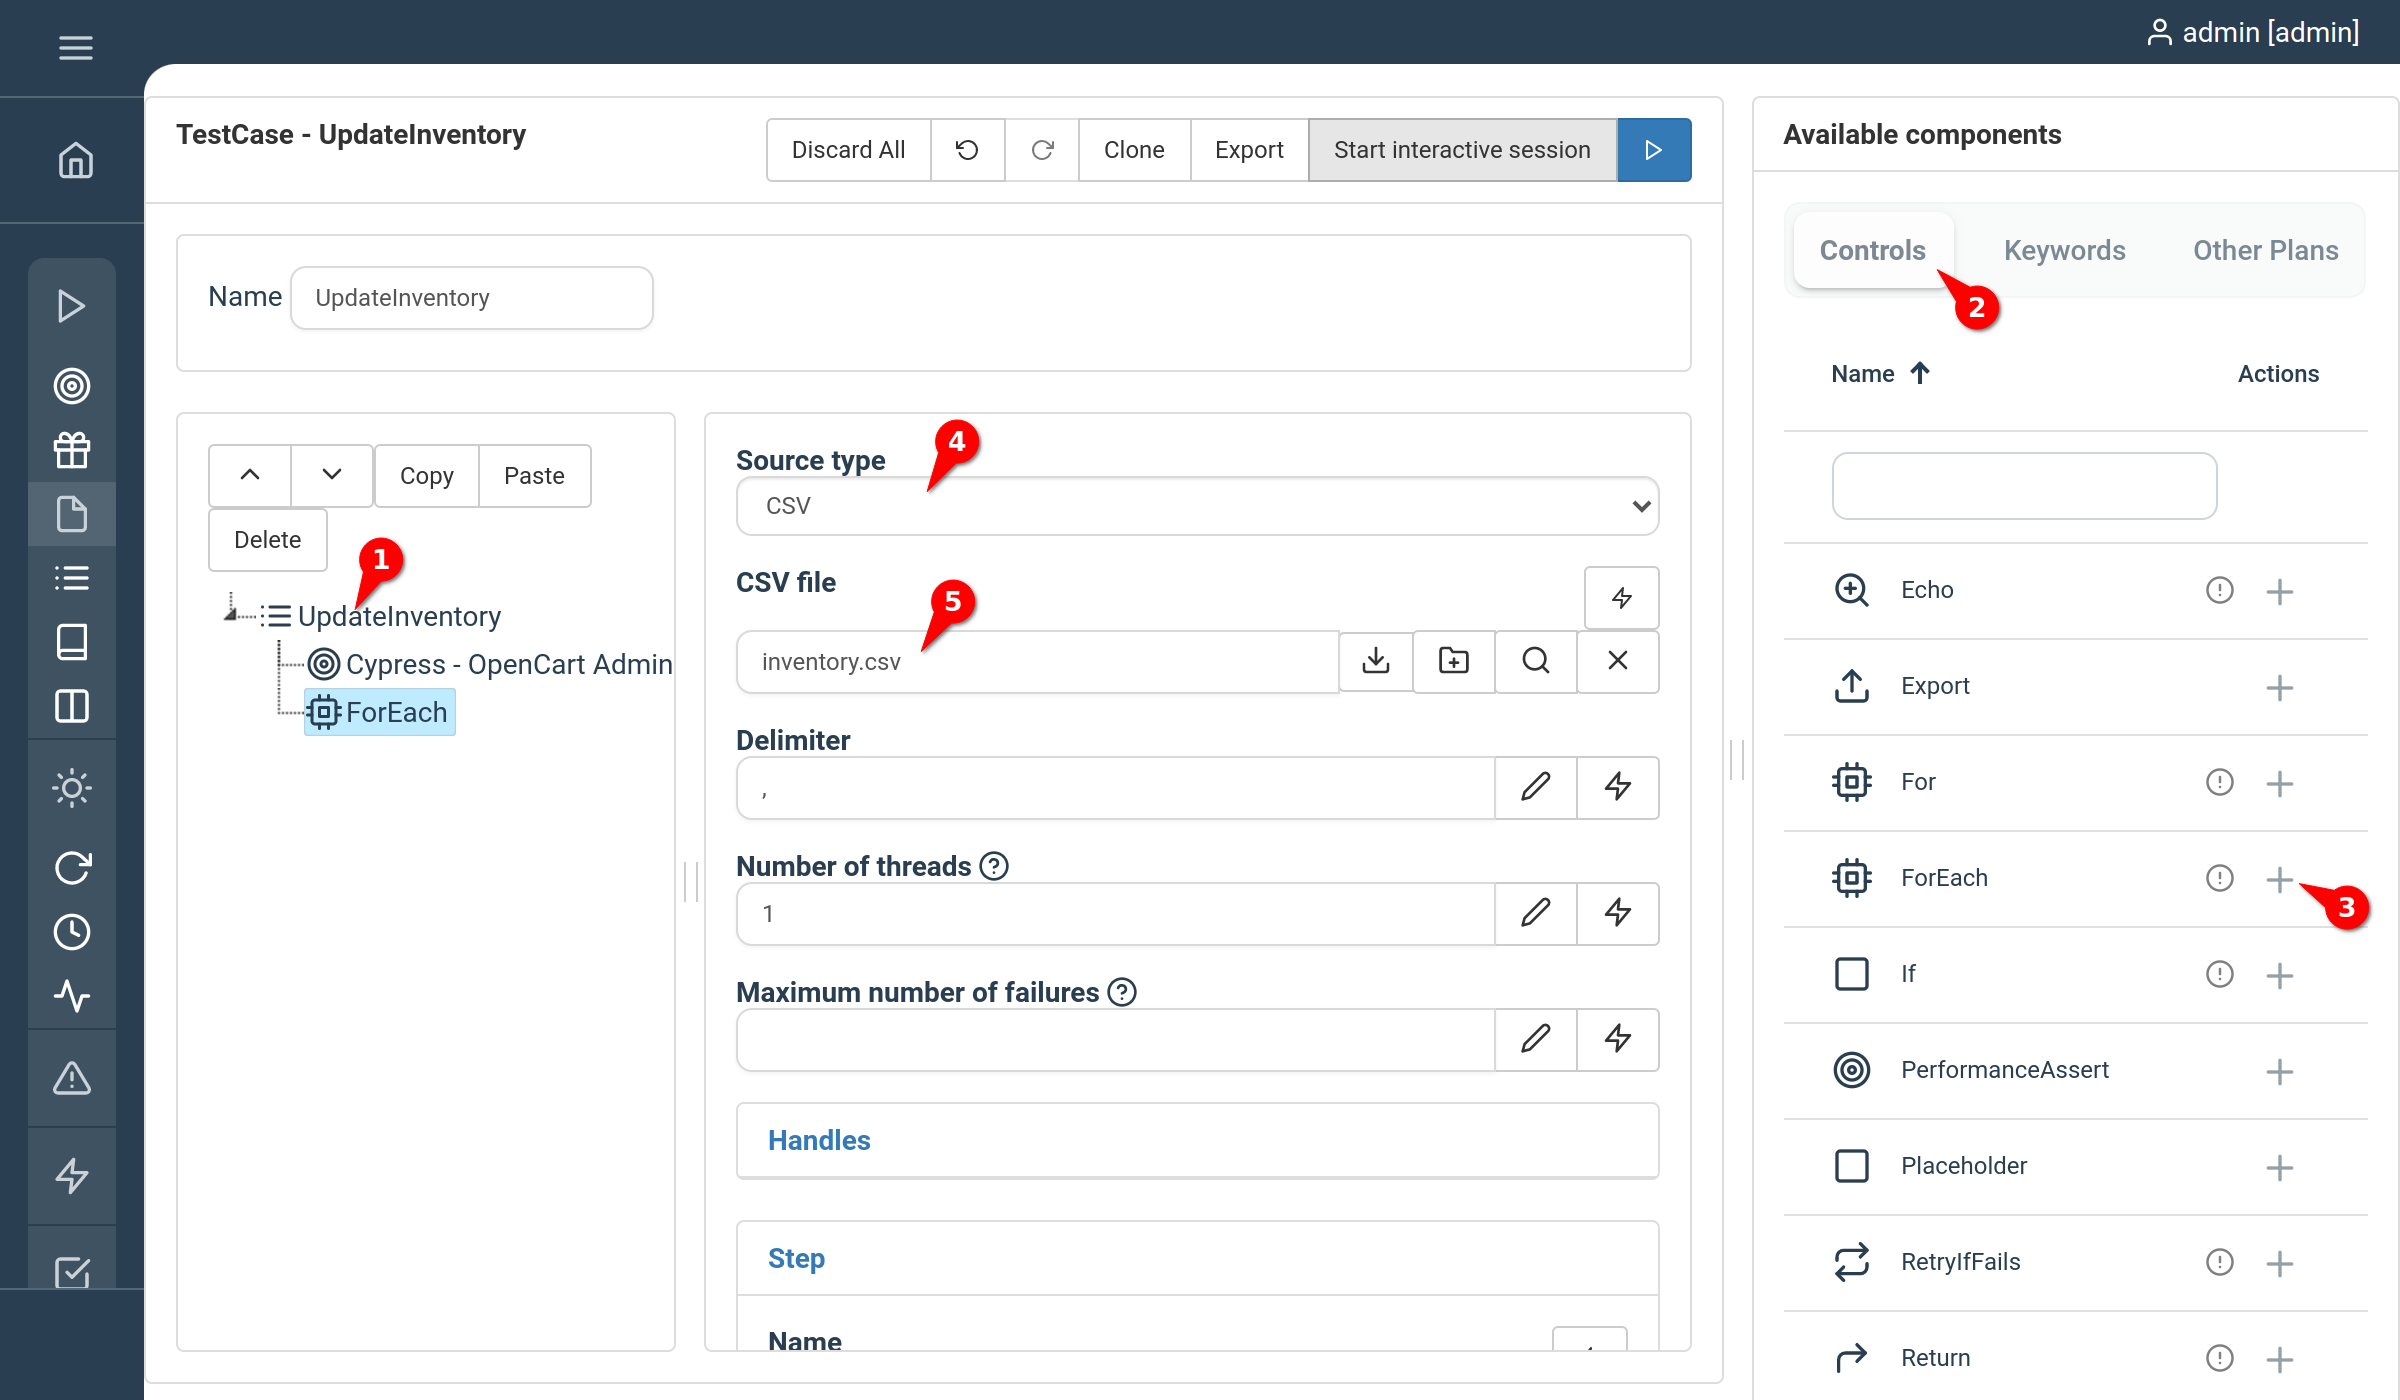
- Select the root element of your plan
- Select Controls
- Find the ForEach control and click the + button to add it to the plan
- As Source Type choose CSV
- Drag and drop or use the file chooser to choose the prepared CSV file: samples/keywords/cypress_RPA/opencart_RPA/cypress/fixtures/inventory.csv
5. Set STEP-variables
In order to feed our Inventory Update Keyword with data from the CSV, we need to create STEP variables.
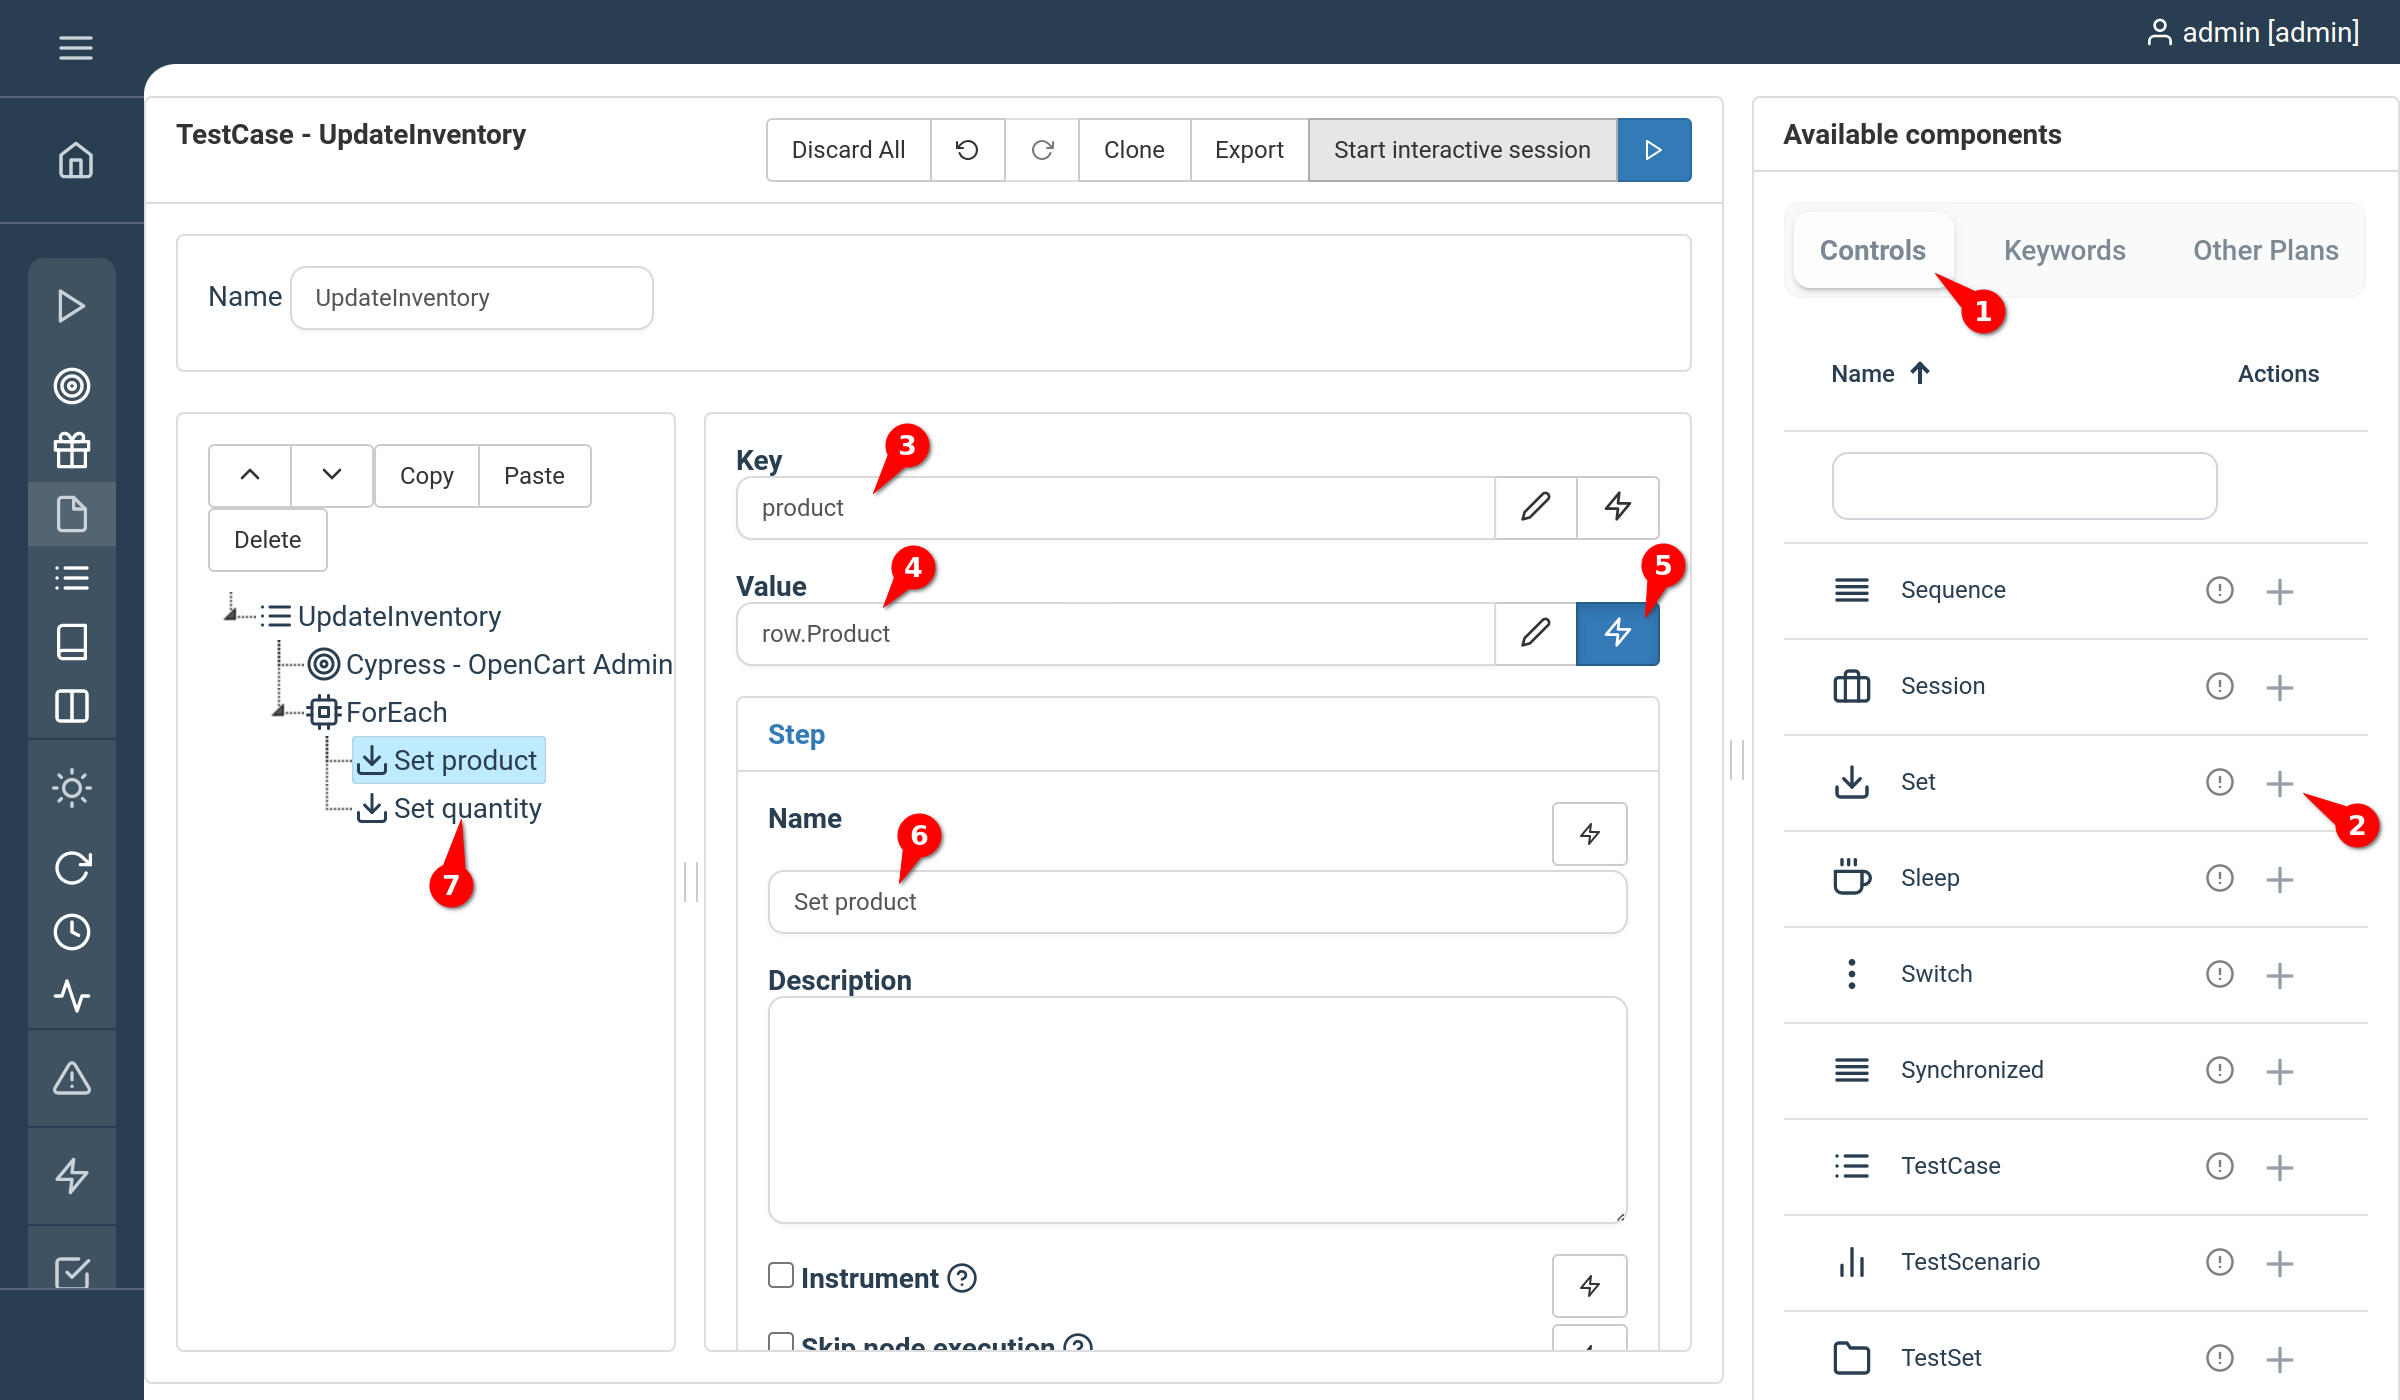
- Select Controls
- Find the Set control and click the + button
- As Key type “product”
- In the Value field, type “row.Product”. Note that “row” refers to each row in the CSV and “Product” is the name of the first column
- Activate the button with the lightning icon to mark the value as dynamic
- Name this control “Set product”
- Create another STEP variable named “Set quantity” by repeating points 1-6 with Key “quantity” and Value “row.Quantity”
6. Loop the Inventory Update Keyword
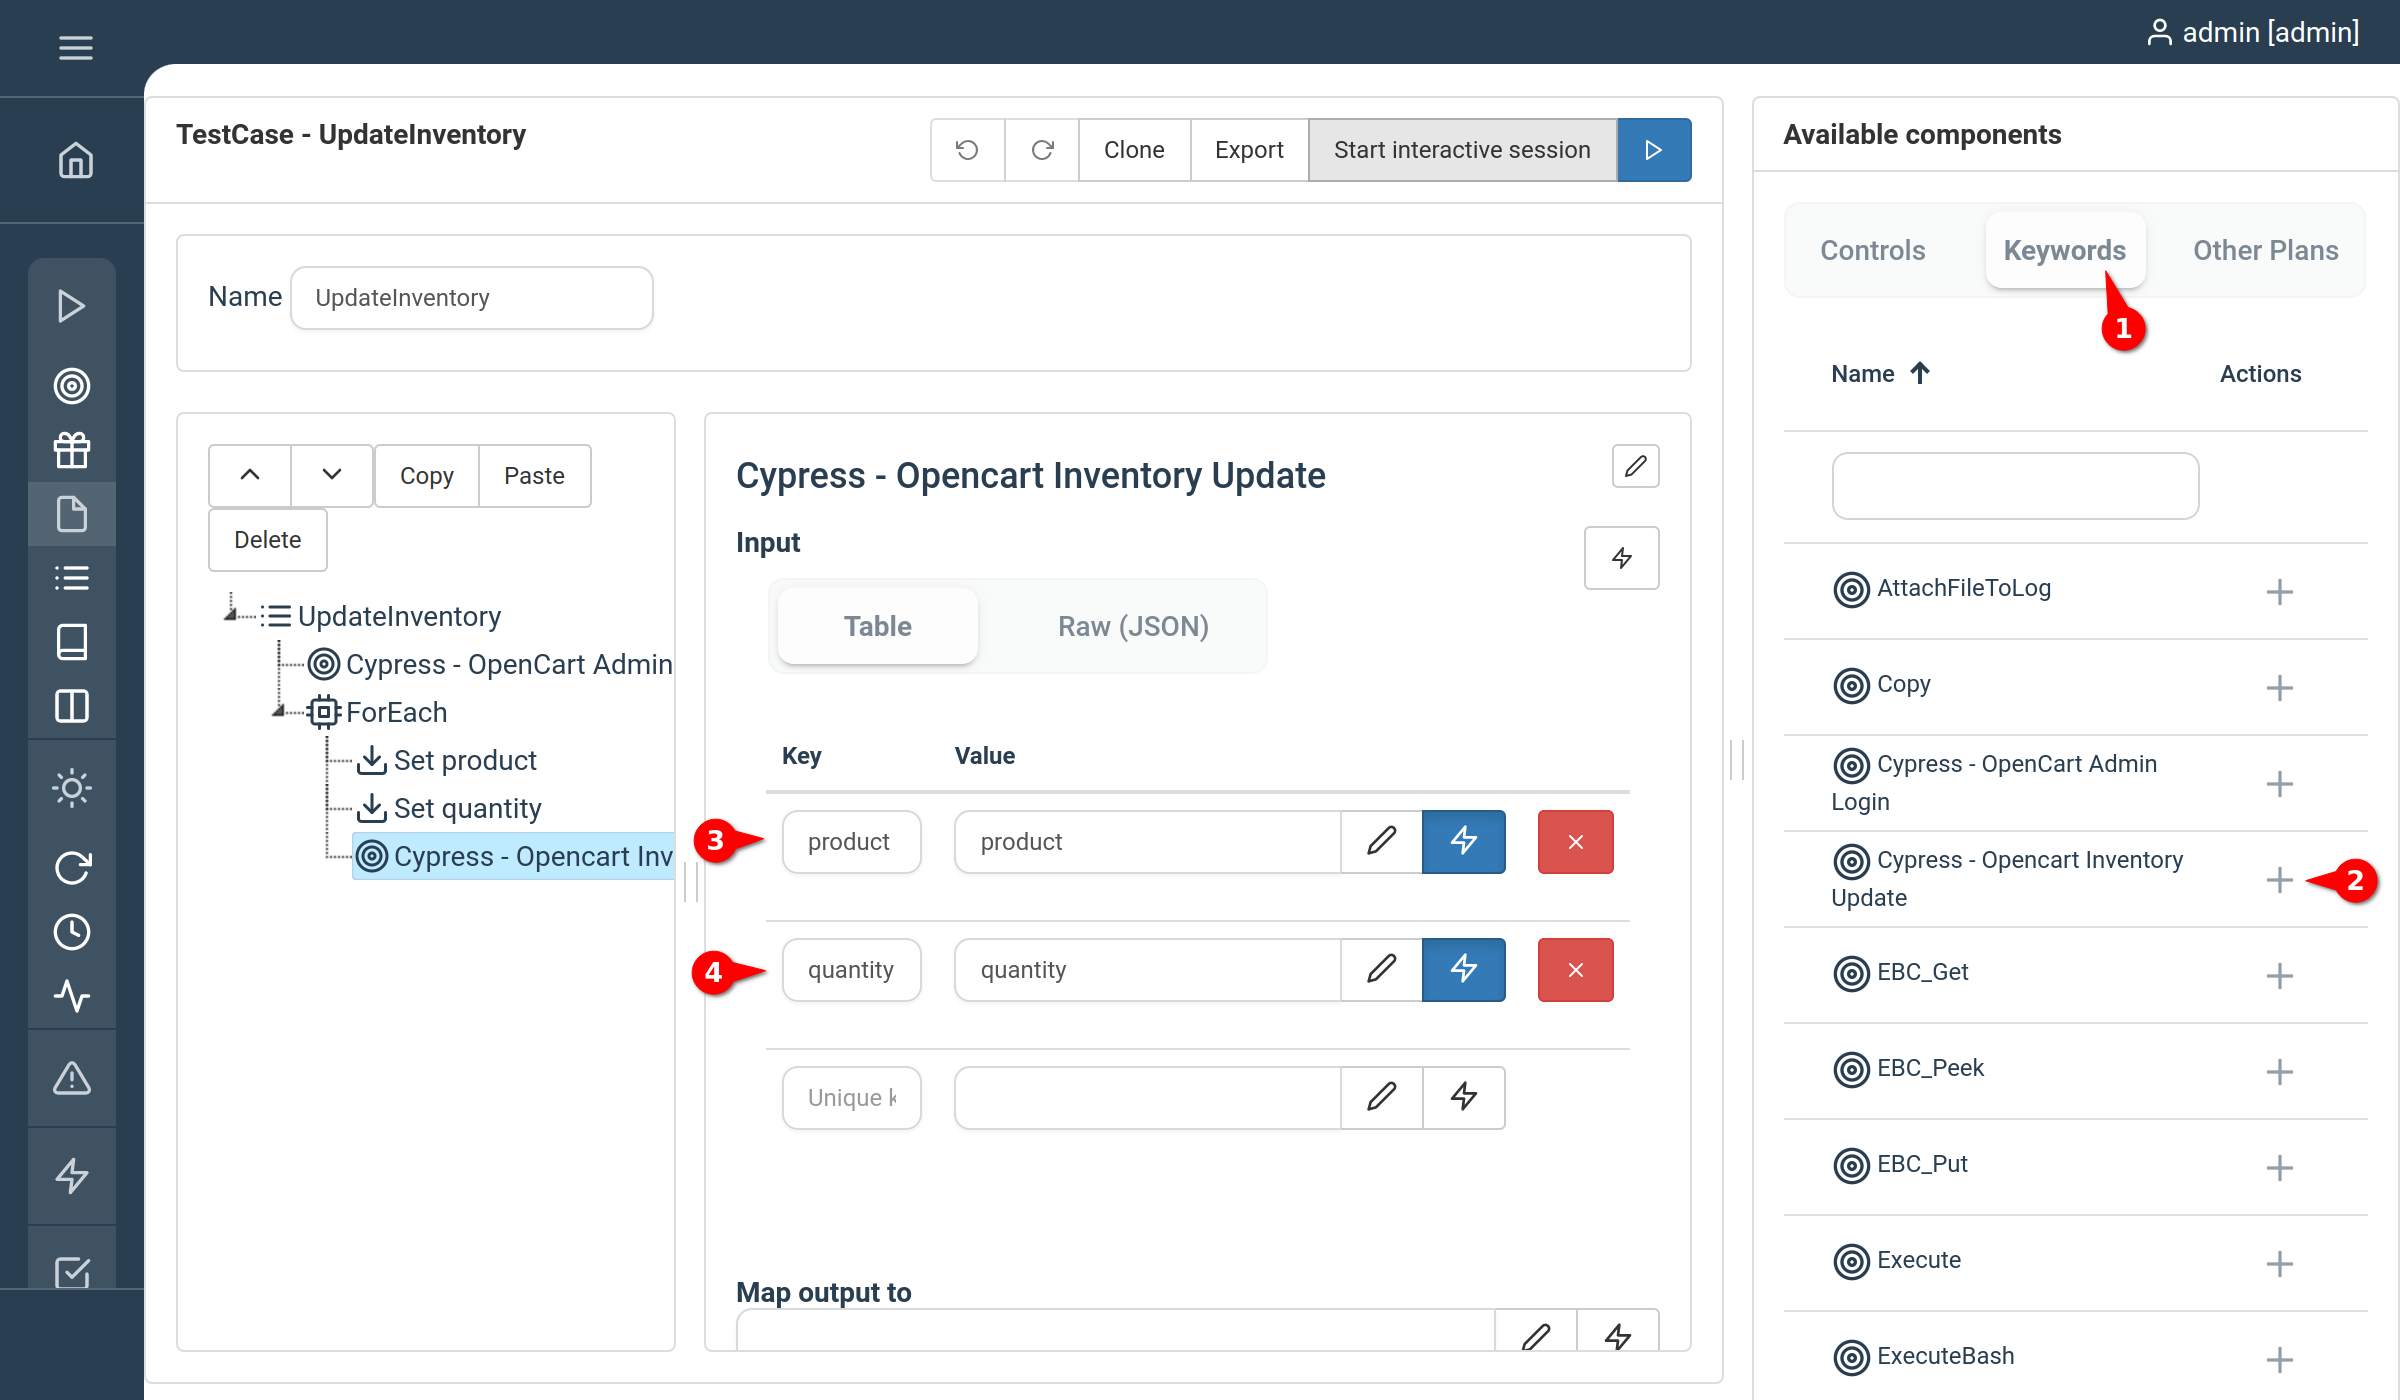
- Select “Keywords”
- Find the Inventory Update Keyword and click its + button to add it to the loop.
- Add a Key-Value pair with Key “product”, Value “product” and set it to dynamic. This maps the input variable to the STEP variable we defined previously.
- Add another Key-Value pair with Key “quantity”, Value “quantity” and set it to dynamic.
7. Run the Automation and check results
To run the RPA, simply click the start execution button (play icon) on top of the plan and confirm by clicking it in the dialog again. This will update the inventory according to the changes listed in the CSV file.
You now know how to automate tasks using Step and Cypress, and can use this to greatly improve the work efficiency of your business.
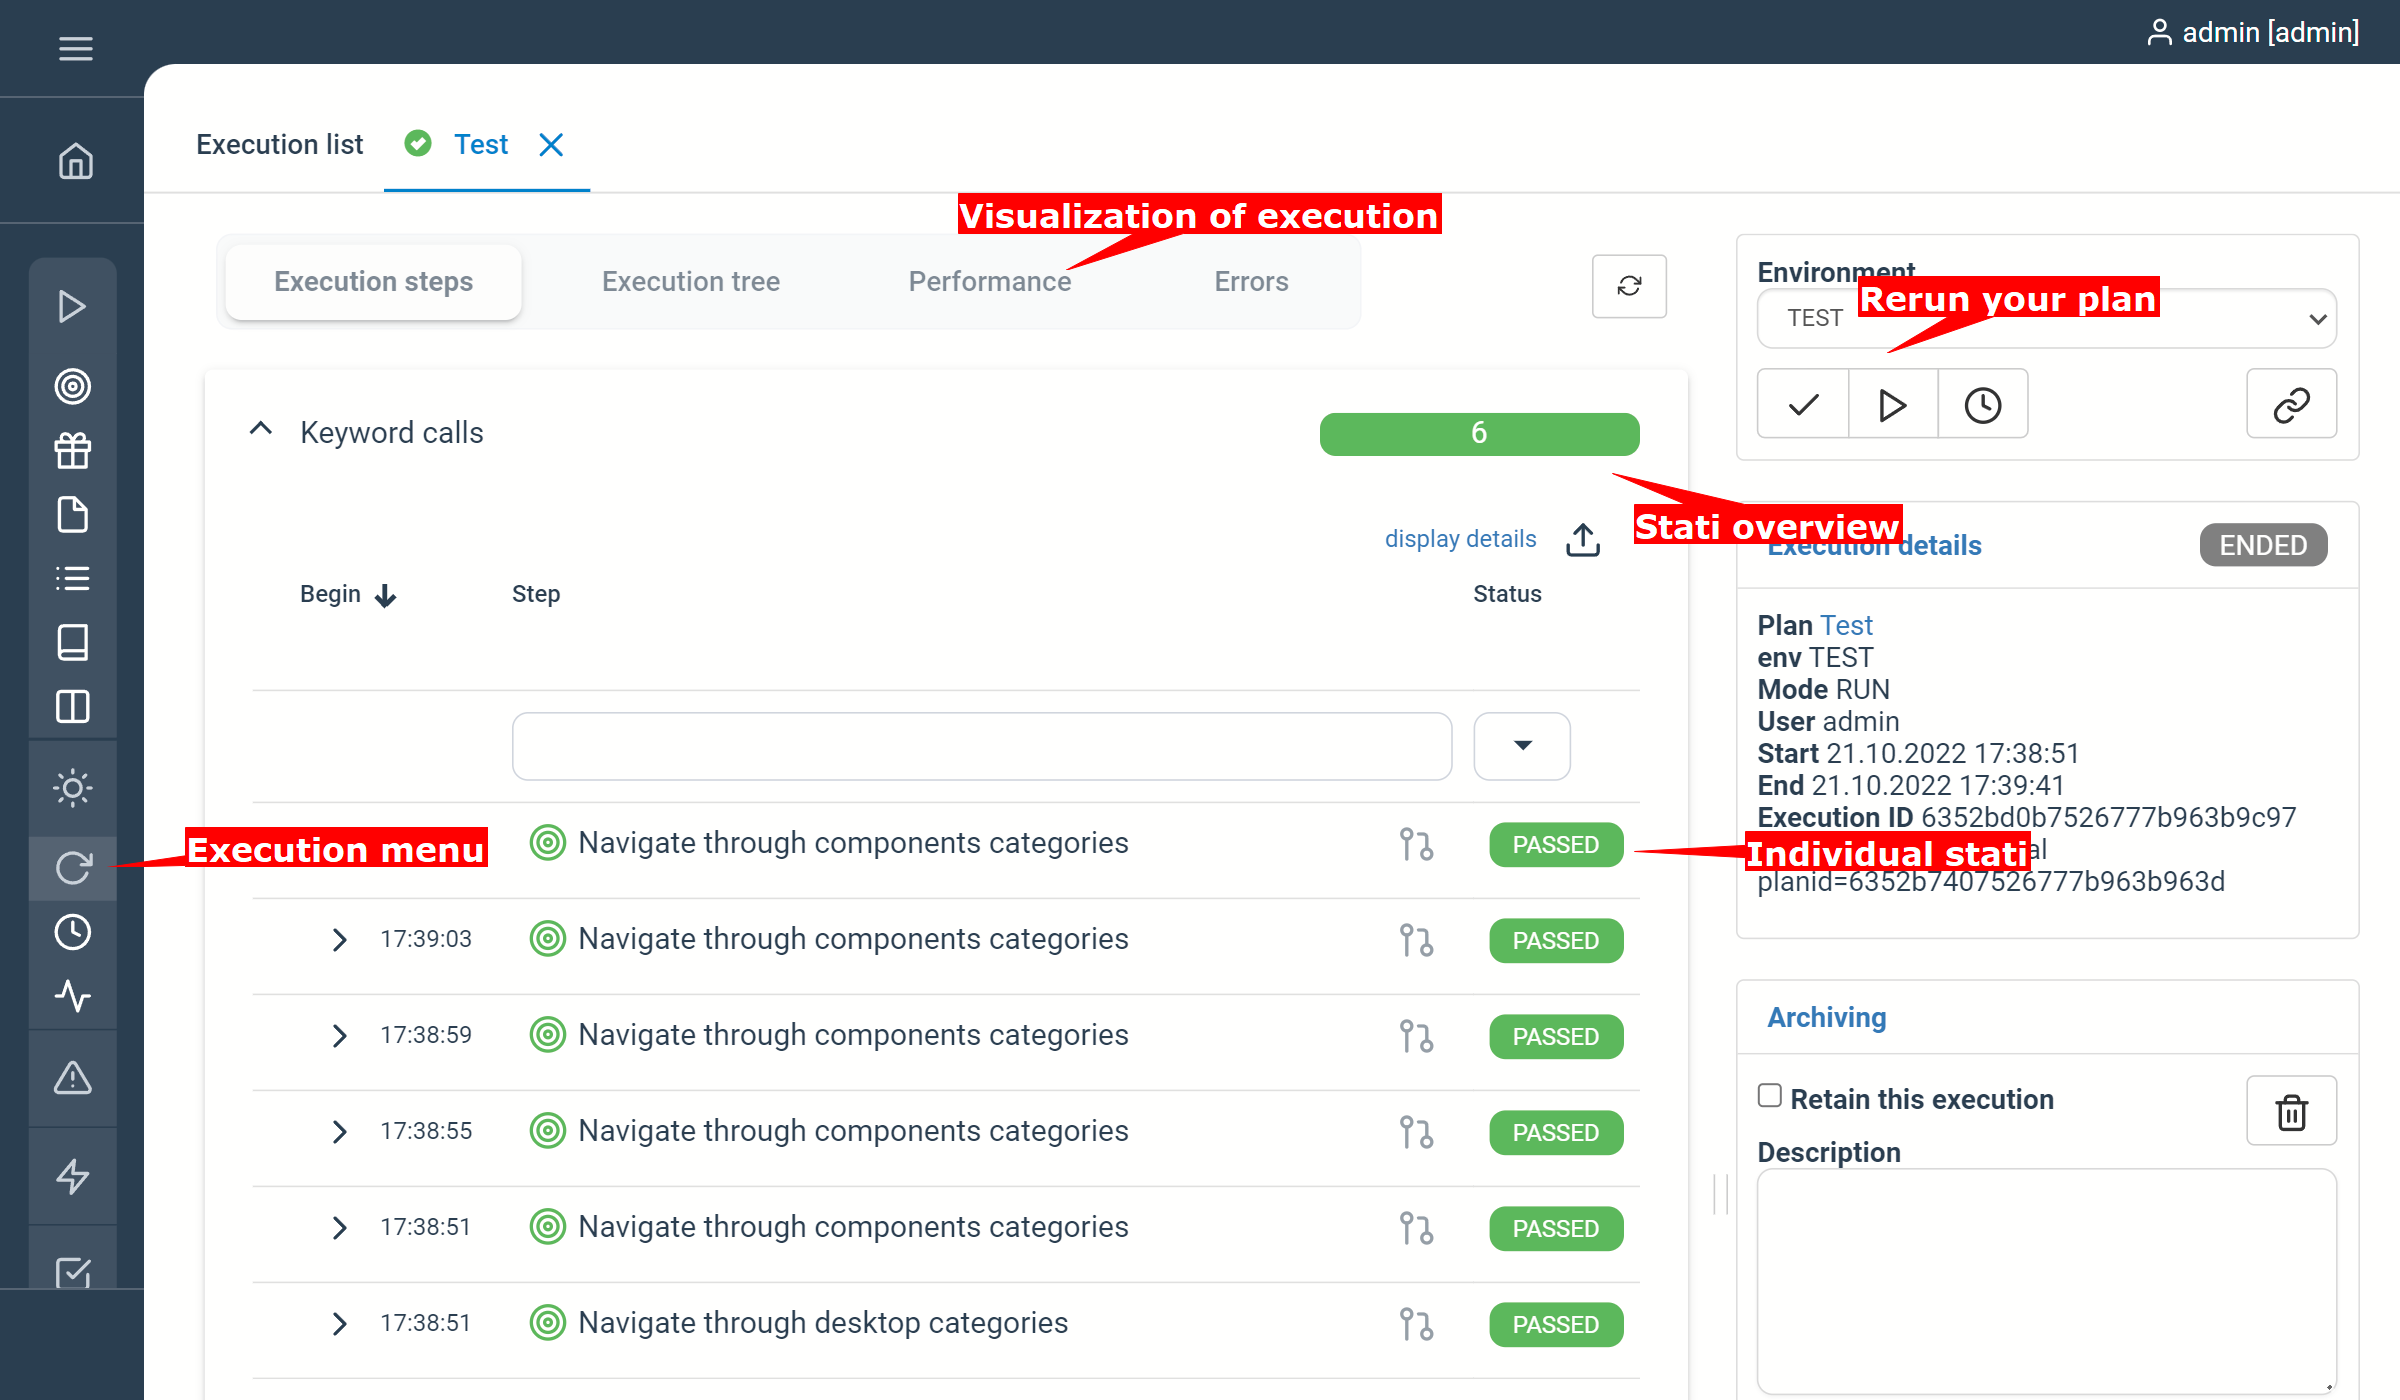
8. Check the status of your executions on the “Executions” tab
The execution automatically opens, you can continue using Step and go to Executions in the menu and click on an individual execution to get a detailed view of that execution to open it again.
Hint: This can be done at any time, including when an execution is currently running

This article demonstrates how to connect Grafana to data generated by Step.
This article demonstrates how to set up distributed system monitoring using Keyword executions, and analyze the results as measurements.
This tutorial demonstrates how to automate interaction with Microsoft Office applications using the Office Interop Assembly.

This article provides documentation for how to integrate JUnit tests into Step.
This tutorial demonstrates how Step can be used to monitor services, availability and performance metrics.
This tutorial demonstrates how to utilize the AutoIt C# binding to automate interactions with Windows applications.

This article demonstrates the automation of mobile applications on Android using the Appium framework.
This article defines three Keywords which will be used in browser-based automation scenarios, using Step and Selenium, as general drivers.

This tutorial shows you how to efficiently set up a browser-based load test using existing Cypress tests in the Step automation platform.
In this short tutorial, we show how to quickly implement a simple browser-based load test based on Cypress scripts in Step.

This tutorial shows you how to efficiently set up a browser-based load test using existing Playwright tests in the Step automation platform.

This article explains Keywords in Step and demonstrates how to create simple ones.

This tutorial demonstrates the design, execution, and analysis of functional tests using the web interface of Step.
This tutorial will demonstrate how to use Step and Selenium to automate various browser tasks.
This tutorial demonstrates how Selenium automation tests can be turned into full synthetic monitoring using Step.
In this tutorial, we'll show you how to easily set up and run a browser-based load test with Step's wizard, using your existing Cypress tests, on the Step automation platform.

This tutorial shows you how to efficiently set up a browser-based load test using existing Selenium tests in the Step automation platform.

This tutorial demonstrates how Playwright automation tests can be turned into full synthetic monitoring using Step.

This tutorial demonstrates how Cypress automation tests can be turned into full synthetic monitoring using Step.

This tutorial will demonstrate how to use Step and Playwright to automate various browser tasks.
In this tutorial, we'll show you how to easily set up and run a browser-based load test with Step's wizard, using your existing Playwright tests, on the Step automation platform.

Learn how to quickly set up continuous browser-based load testing using Cypress tests in your DevOps pipeline
Quickly integrate K6 based load-tests in your DevOps workflow
This tutorial demonstrates how Playwright tests can be reused for synthetic monitoring of a productive environment in a DevOps workflow
This tutorial demonstrates how Playwright tests can be reused for synthetic monitoring of a productive environment in a DevOps workflow
In this tutorial you'll learn how to quickly set up a protocol-based load test with okhttp

Learn how to set up continuous end-to-end testing across several applications based on Playwright tests in your DevOps pipeline using Step
Learn how to quickly set up continuous browser-based load testing using Playwright tests in your DevOps pipeline
Want to hear our latest updates about automation?
Don't miss out on our regular blog posts - Subscribe now!
